Common Questions
Mouse & Accessories
General
How can I resolve a double-clicking issue with my mouse?
Checking if Your Mouse Double Clicks
If you are experiencing issues with your mouse double clicking, there are a few simple steps you can take to diagnose and fix the problem. Here is a step-by-step guide to help you troubleshoot your mouse:
1. Hold your mouse flat on a surface and show that you are using only one finger by folding the other fingers.
2. Click on the middle of the button, at the level of the wheel.
3. If your mouse is double clicking, you can perform a chattering test using this link: https://codepen.io/blink172/pen/vERyxK
Fixing the Double Clicking
If you have determined that your mouse is double clicking, there are a few things you can do to fix the problem:
1. Clean your mouse switches: Dust trapped under the switches can cause double clicking. In some cases, double clicking can be fixed by cleaning the mouse using compressed air.
2. Increase debounce rate: Double clicking can be caused by slight vibrations and can be solved by changing the debounce rate when the double clicking is minor.
3. Changing the switches: If the previous methods did not solve your issue, your switches are most likely defective and need to be replaced.
How can I troubleshoot issues with my mouse?
If you are unable to fix an issue on your mouse, you must try to identify the origin of the issue, and find out if there is a part of your products that is defective. If your product is defective, contact your seller. If you bought from Pulsar.gg, send us a ticket on pulsar.gg/support mentioning that you have tried all the tests included in this article, and we will help you fix the issue, send you replacement parts or repair your product.
Here are a few things you should try to identify the cause of your issue and see if you can fix it yourself:
Check the manual instructions: https://cdn.shopify.com/s/files/1/0455/0914/8840/files/Pulsar_Wireless_software_manual_882657c2-5c5d-4c80-a560-a4e8f1e1b133.pdf?v=1662103620
https://cdn.shopify.com/s/files/1/0455/0914/8840/files/Manual_X2_Wireless_Gaming_Mouse_Quick_Setup_Guide_V.01.pdf?v=1659410768
Computer and set up test(figure):
- Have you tried a different PC?
- Have you tried a different USB port?
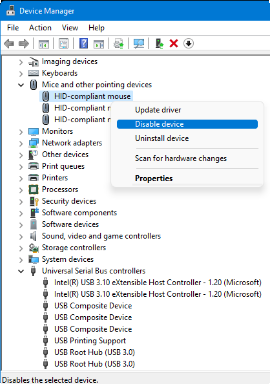
- Have you tried disabling and enabling your mouse and USB drivers? (Windows Menu>Device Manager> Mice and other pointing devices> disable driver > enable driver, Universal Serial Bus controllers> disable driver > enable driver)
- Have you tried removing all other devices plugged in your PC?
- Can you hear a sound from your computer when you plug in the receiver?
- Have you tried putting away any objects on your set up that may interfere with the signal?
- Have you tried a different mouse pad?
Software test:
- Have you tried uninstalling and reinstalling the latest software?
- Have you tried updating your mouse's firmware?
-Have you tried updating the firmware of the receiver?
More information on how to do that on this page:
https://support.pulsar.gg/support/solutions/articles/67000682624-how-can-i-update-the-firmware
https://www.pulsar.gg/pages/download-xlite-wireless
- Have you tried changing the sensitivity, scrolling speed, double click speed, LOD, Ripple Control, Motion Sync, Polling rate and DPI settings?
- Have you tried pairing your mouse again?
More information on how to pair your device on this page:
https://support.pulsar.gg/support/solutions/articles/67000682285-xlite-wireless-pairing
Battery test:
- In the Xlite Wireless software, change your polling rate to 125Hz, and DPI Effect to OFF, how many hours does your battery last?
- When plugging your mouse into your computer, what is the color and effect of the LED?
- Turn off your mouse, plug it in directly with the cable, does it work? What color and effect is the LED?
Switch test:
- Try this test: https://www.onlinemictest.com/mouse-test/
Cable test:
- Have you tried using a different cable
- Have you plugged in the cable all the way in the mouse? (Halfway only charges)
- Have you tried the cable on a USB charger?
- Have you tried the cable on a different device such as a USB-C phone?
- Have you tried plugging in the receiver directly in your USB port?
- Does your mouse LED react when plugged in?
Receiver problem:
- Does your mouse work in wired mode?
- Have you tried a different USB port?
- Have you tried disabling and enabling your mouse and USB drivers? (Windows Menu>Device Manager> Mice and other pointing devices> disable driver > enable driver, Universal Serial Bus controllers> disable driver > enable driver)
- Have you tried putting away any objects on your set up that may interfere with the signal?
- Have you tried removing all other devices plugged in your PC?
- Have you tried pairing your mouse again?
More information on how to pair your device on this page:
https://support.pulsar.gg/support/solutions/articles/67000682285-xlite-wireless-pairing
- What color and effect is your mouse’s LED when turned on and not plugged?
- Have you tried a different computer?
Mouse LED Signal meaning:
Off= No power
Yellow/Orange blink every 1 second = Charging
Yellow/Green blink every 0.5 second = Pairing Mode (Activated by pressing Left, Right and scroll clicks for 3 seconds)
White/Blue blink every 4 seconds = Bricked, PCB needs to be replaced
Blink Red= Out of battery
Steady White= Fully charged, plugged in
Keyboard
- Have you tried changing the switch of your key using the tool that was provided in the box?
- Have you tried updating your software?
- Have you tried resetting your current profile on your PulsarFusion software?
exePairing Tool...(1.75 MB)
How do I change the DPI?
There are different ways to change the DPI on a Pulsar gaming mouse, depending on the specific model.
You can download the software and change the DPI settings from the software. The software allows you to customize the DPI settings to your preference.
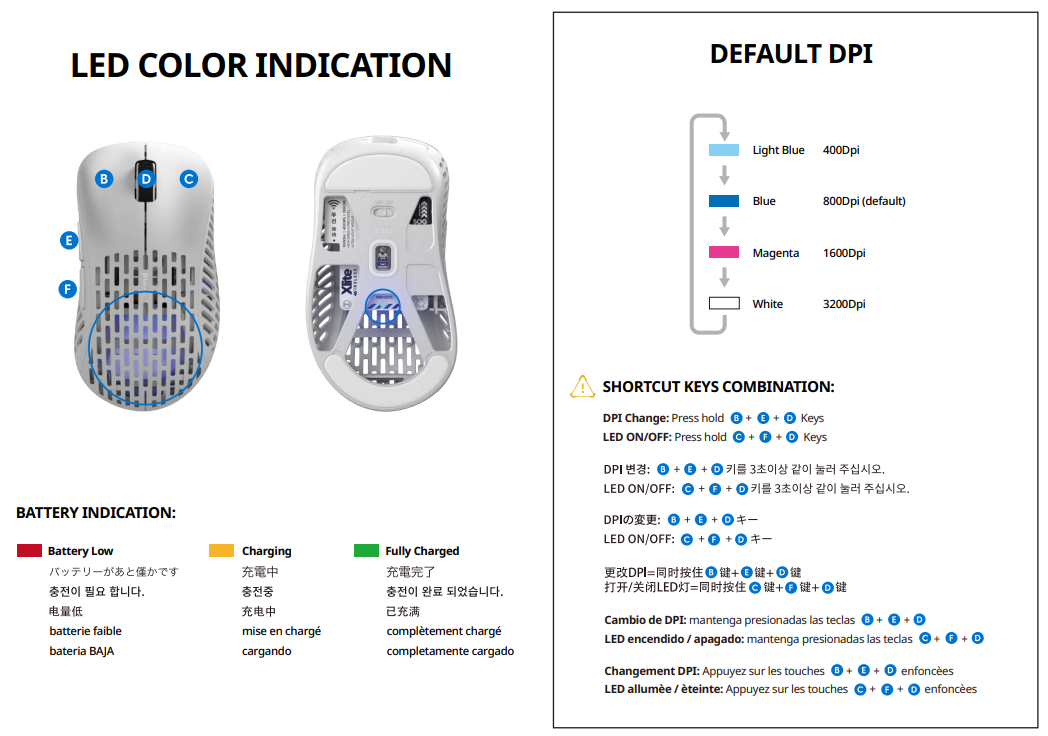
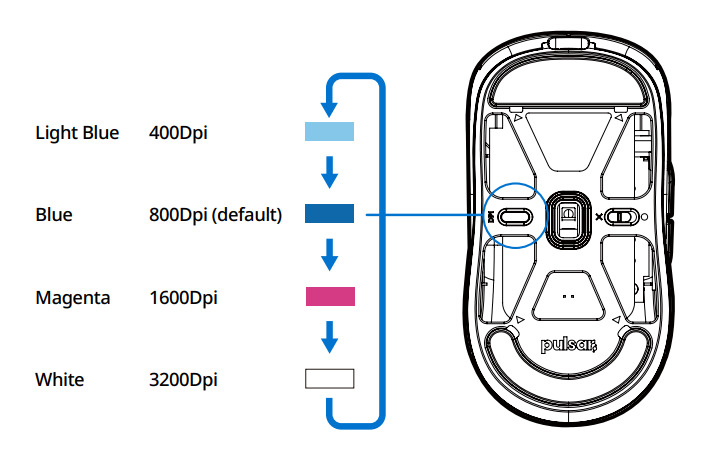
On the Xlite V2, you can change the DPI by long-pressing the M1 (B) , scroll button (D), and forward side button (E) simultaneously for three seconds.(Left figure)
For other Xlite gaming mice that feature a dedicated DPI button , you can simply press that button to switch between different DPI settings.(Right figure)
How can I disassemble my mouse?
Disassembling your mouse may affect your warranty, and you should ask permission by submitting a ticket on pulsar.gg/support
Any part broken during this process or by doing something unintended or using the mouse in an unintended matter may not be covered by your warranty.
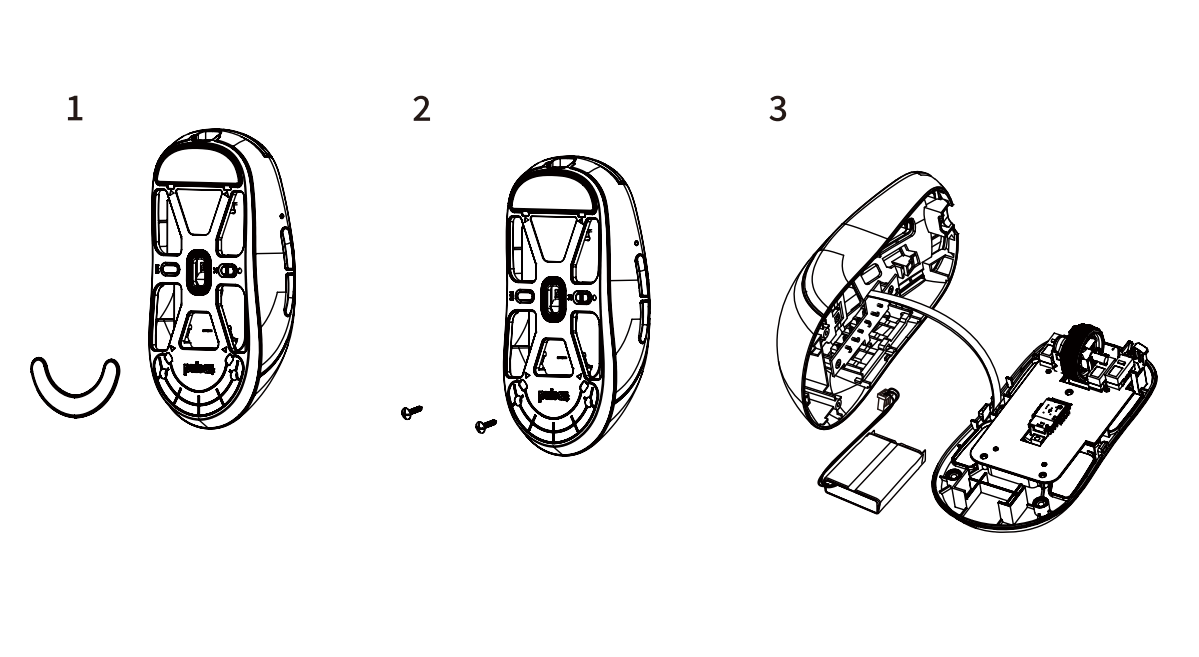
Disassembling your mouse involves removing the back PTFE which will not perform as well after applying them again, and you should make sure to have spare feet before removing them.
1. Remove the back PTFE
2. Remove the two screws
3. Disassemble the mouse by first separating the base from the top shell
Will it work on an Apple computer?
The X2 and Xlite series mice are designed to be compatible with a wide range of computers, including Apple Macs.
However, it's important to note that the software provided with these mice is not compatible with Mac OS.
To adjust your mouse settings, you will need to use a Windows PC and install the software on it.
Once you've customized your settings, they will be saved in the mouse's internal memory, allowing you to use these configured settings when using the mouse with your Apple computer.
If you have difficulties finding a Windows-running PC, what you may be able to do is to run the software on your Mac using a virtual machine, such as Wine. https://www.winehq.org
Additionally, Apple's newer Macs with M1 chips have a feature called "Rosetta 2" which allows you to run some Intel-based Windows applications through emulation.
You can easily change the DPI (Dots Per Inch) settings by either using the DPI shortcut or pressing the dedicated DPI button on the mouse.
How can I reset or update my firmware?
To reset or update the firmware for your mouse. follow these steps:
Mouse Update:
For X2H, X2V2 and X2A, please refer to this article: X2V2, X2H, X2A Firmware Update
1. Download the firmware found on pulsar.gg/download
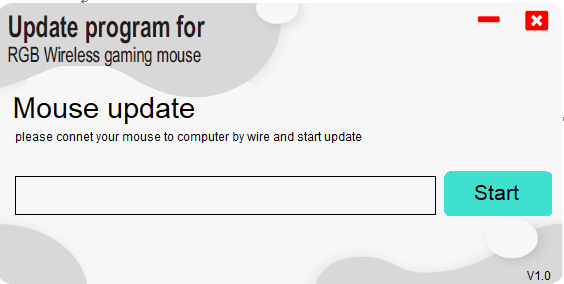
2. Connect the mouse to your PC using the cable provided (Wired Mode).(Left figure)
3. Run the Mouse Update program.
4. If the Start button is gray instead of green, try using a different USB port or restart your PC.
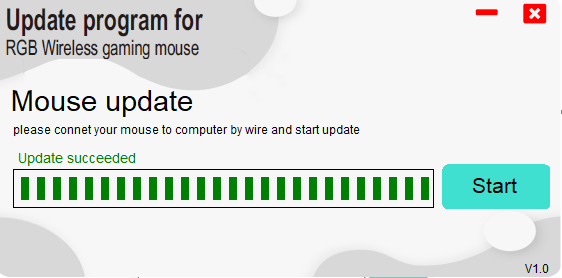
5. Click the Start button to begin the firmware update process.(Right figure)
6. Wait for the update to finish. The program will display "Update Succeeded" when it's done.
Are the settings stored in the mouse?
When you change the settings on your mouse and apply them, they are saved in the mouse's internal memory. This means that if you use the mouse on another computer, it will retain the settings that you previously saved. However, if you want to customize your settings on an operating system that is not compatible with our software, such as Mac OS, Android or Playstation OS, you must find a Windows OS running PC and adjust your settings there first.
While using the mouse, you can easily switch between the five DPI profiles by using the DPI button or the DPI shortcut, depending on your mouse. However, you cannot change any other settings while using the mouse. Therefore, it is recommended that you customize your mouse settings on a Windows OS running PC before using the mouse on another operating system. This way, you can ensure that your settings are properly configured and ready to use.
How can I fix a mouse jittering, jumping or similar sensor issue?
There can be several reasons why this is happenning.
1. The LOD is not set up properly
The LOD must be adjusted depending on the distance between the snesor and your mousepad. If it is not adjusted properly, your mouse cursor may not move properly. This is particularly important if you use different feets on your mouse or if you use reflective or translucid mousepads.
2. Your mousepad: use a different one.
Some mouse pads or desk surfaces may affect your sensor negatively. Make sure it is flat, not reflective, consistant in texture and smooth. Changing your mousepad may solve your issue.
3. Something on your setup is interefering with your wireless signal.
If this only happens when your mouse is used wirelessly, then this is likely caused by something on your set up that is interfering with your mouse. Remove any wireless signal /magnetic/radiation emmitting objects from your set up. These include other wireless mice and receivers, wifi routers, phones, laptops. Make sure your receiver is as close as possible to your mouse using the provided extender.
4. Reset your mouse and your software.
a) Reinstall the latest software and restore the settings
b) Reinstall your mouse firmware accordingly
5. Try these tests: https://support.pulsar.gg/en/support/solutions/articles/67000709949-how-can-i-troubleshoot-issues-with-my-mouse-
If your issue is still occuring after all these tests, your product may be defective. If it is only occuring when plugged in, it could be that your cable is broken. If it only happens when used wirelessly,your receiver or wireless antenna may be defective. Otherwise, it could also be an issue with your PCB or sensor. In that case, you should contact your seller if your warranty is still valid. Make sure to inform your seller that you have already tried all the tests above.
What shape of mouse would fit me?
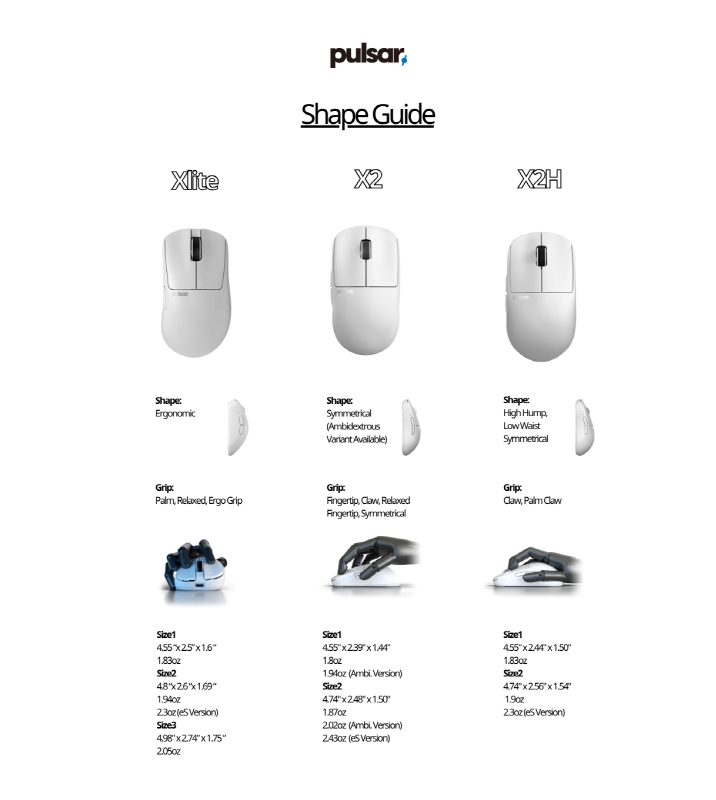
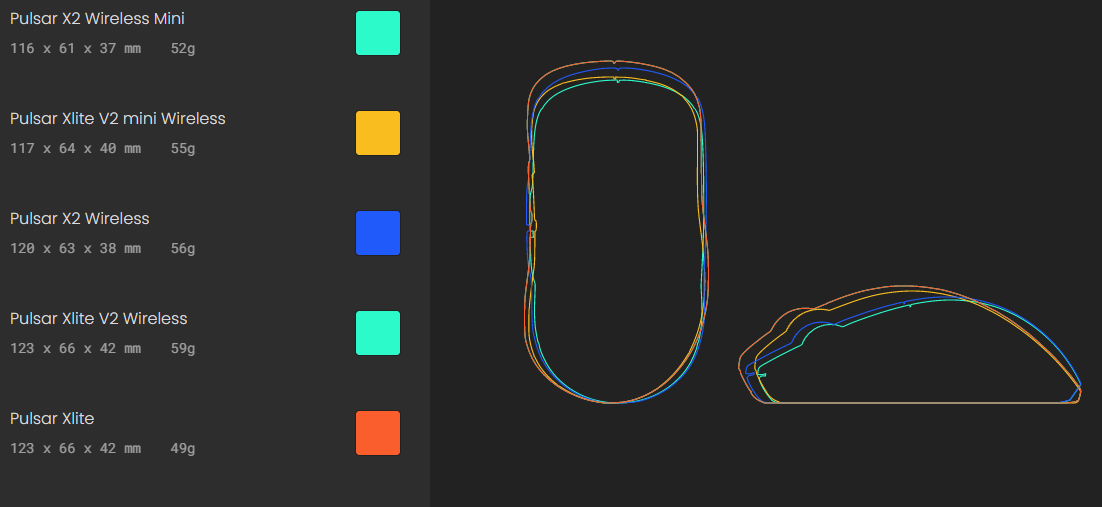
The Xlite series are ergonomic shapes. The curves makes them great for relaxed/palm grips styles, and large hands. The X2 series are symmetrical shapes and generally are better for fingertip/clawgrip styles.For small hands with claw grip, go for the X2 mini. Generally, the X2 series are more flexible to diverse types of grips and hand shapes.
If you want to have a precise view of the mice dimensions compared to other brands, click here.
Will you restock this product? If so, when?
If the product is a limited edition, only 1 batch of the product will be sold. So if it is sold out, it is unlikely that it will be restocked. However, limited editions can be restocked for several reasons including canceled shipments, canceled orders, or reseller inventory returns. Note that we only sell new products and products that have been received by other customers are not sold again, even if the packaging seals have not been broken.
For limited editions, there is no way to know when they will be restocked, the only way is to regularly check on our online store.
If a product is not a limited edition and is not EOL, there may be plans to restock the item. Big restocking events will be announced in the weekly newsletter, so make sure to subscribe by writing your email in the section on our pulsar.gg. Otherwise, please contact us by submitting a ticket on pulsar.gg/support and selecting the "General inquiries" section. If a product is EOL, we will not restock it. To know if a product is EOL or a limited edition, you must contact us directly by submitting a ticket.
To stay updated on the latest restocking/product launching events, please read this article:
https://support.pulsar.gg/support/solutions/articles/67000723183-how-to-be-updated-on-new-upcoming-products-and-restocking-
How to fix a bricked mouse?
If your mouse is blinking white/blue every 3-4 seconds and is unresponsive, it is likely bricked. Unfortunately, this is irreversible and the PCB needs to be replaced.
This can be caused by the following causes:
- Liquid spoilage
- Wrong firmware installed
- Mouse internal modification/wrong parts installed
- Wrong charging voltage/method
Mouse and Receiver Connection Range
For the best performance of your mouse and receiver, remember these.
1. Receiver and Mouse Dongle Range:
Recommended Range : Keep the receiver and mouse dongle within 2 meters for a reliable connection.
Maximum Range : Avoid exceeding 10 meters to prevent signal loss.
2. Mouse and Dongle Range:
Ensure that the mouse and dongle are within a 20-centimeter distance for a successful connection.
3. USB Extension Cable:
Use the provided USB extension cable when connecting the receiver and the dongle to prevent signal interference, ensuring a stable and interference-free connection.
In summary, adhere to these range guidelines for an uninterrupted and efficient mouse and receiver connection.
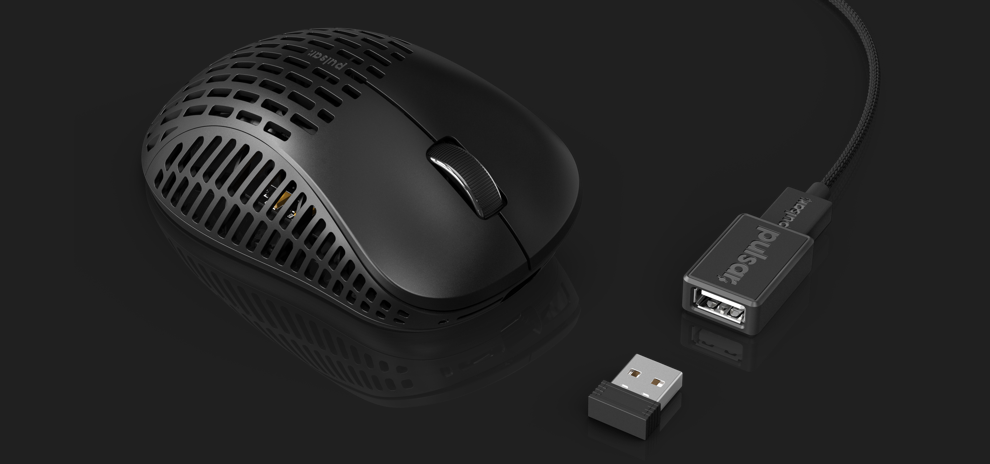
How to Connect a 4K Dongle
1. Download the Pulsar Fusion software along with the 4K Wireless Pairing tool :
2. Connect the 4K dongle to your computer.
Please connect ONLY the dongle you want to pair with the PC. If you connect multiple dongles.
3. Run the pairing tool program.
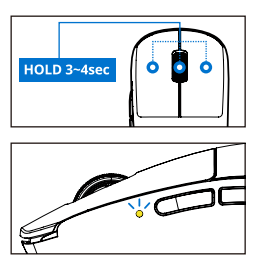
4. Press and hold the buttons as shown in the image for 3 to 4 seconds, and the LED indicator will then blink in yellow.
5. Click on the "Pair" button
The mouse is currently connected to the most recently paired dongle. When switching from the 4K dongle to a regular dongle, you will need to repeat the pairing process.
Can I Purchase Parts?
At our company, we understand the importance of having a fully functional device.
We know that sometimes accidents happen, and parts may need to be replaced.
Unfortunately, we do not offer individual parts for sale, such as the shell, side buttons, and PCB.
We apologize for any inconvenience this may cause. However, we do offer a 2-year warranty that covers repairs for your convenience. If you encounter any defects, please do not hesitate to contact our customer support team. They will be more than happy to assist you with the repair process.
Regrettably, self-repair is not an option as we do not sell any parts separately. We strongly advise against attempting to repair the device on your own, as this may cause further damage and void your warranty. Our team of experts is trained to handle any repairs that may be necessary, ensuring that your device is restored to its original condition.
If you have any questions or concerns regarding our warranty or repair process, please refer to our warranty page for more information.
My mouse is stuttering/lagging/skipping while on Wireless mode.
This type of symptom is 99% of the time caused by something on your setup that's interfering with your setup, make sure to bring your receiver at least 20cm in front of your mouse, and remove any wave-emitting devices close by (Bluetooth products, Wifi Routers, etc). If it were a sensor/MCU/firmware issue, it would also occur on wired mode.
Also try checking that it's not an issue coming from your PC, by using a different USB port and a different PC.
If you are using 4000Hz (4K dongle), this could be due to an overload, your mouse is sending too much data to your PC, and your PC cannot process it quickly enough. Try removing other high polling rate devices from your PC, lowering your polling rate, or use a more performant gaming computer that is compatible with 4K polling.
If you believe that your mouse is defective, please contact your seller or submit a ticket above
Having a Sensor Tracking Issue? How to Adjust LOD Value
Here are a few troubleshooting steps that you can try to resolve the problem:
1. Clean the dust on the bottom sensor of the mouse: If the sensor gets dirty, it can affect tracking performance. Please use a dry cloth and compressed air to gently clean the sensor.
2. Clean the mouse pad and mouse skate : Over time, dust and debris can accumulate on the mouse pad and skate, affecting the mouse's performance. Use a dry cloth to wipe down the mouse pad and remove any dirt or debris. Regularly replacing worn-out mouse pads or mouse feet can also be helpful.
3. Adjust the LOD value: The lift-off distance (LOD) can be adjusted in the software. Try adjusting the LOD value to see if it improves the tracking performance of the mouse.
4. Use a different PC and USB port:. Try using the mouse with a different PC and a different USB port to see if the issue persists.
If you have tried these troubleshooting steps and are still experiencing issues with your mouse, please don't hesitate to contact our customer support team for further assistance.
Thank you for choosing our product and we hope to resolve this issue for you as quickly as possible.
eS series
Default settings for eS model
Thank you for choosing our eS model! We want to make sure you have the best experience with our product, so we've put together some information about the default settings for your eS model.
Debounce Time Setting:The debounce time setting on your eS model can be adjusted to 0mS, 3mS, 5mS, 7mS, 10mS, or 12mS.
DPI Setting:The DPI setting on your eS model can be adjusted to 400DPI, 800DPI, 1600DPI, 3200DPI, 6400DPI, or 12800DPI.
Polling Rate Setting:In wired mode, the polling rate setting can be adjusted to 500Hz, 1000Hz, 2000Hz, 4000Hz, or 8000Hz. In wireless mode, the polling rate setting can also be adjusted to500Hz, 1000Hz, 2000Hz, or 4000Hz.
LOD (Lift off Distance) Setting:The lift off distance setting on your eS model can be adjusted to1mm or 2mm.
We hope this information helps you get the most out of your eS model.
If you have any further questions or need assistance with your mouse, please don't hesitate to contact our customer support team.
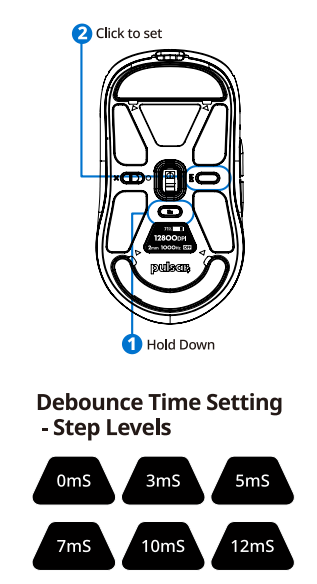
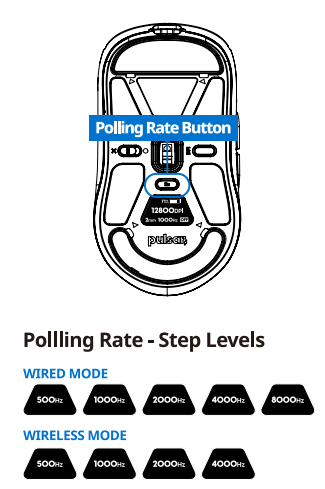
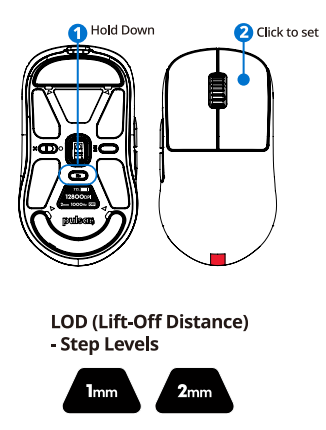
How to Purchase a Replacement eS Dongle for Your Wireless Mouse
If you have lost your eS dongle for your wireless mouse, don't worry!
We understand that this can be frustrating and inconvenient.
Unfortunately, the currently sold 4K dongle is not compatible with the eS model.
However, we have made it easy for you to purchase a replacement eS dongle.
To purchase a replacement eS dongle, simply follow the link below.
4K Dongle for eS Mouse Series (Click)
This will take you to our website where you can place your order.
Our customer support team is also available to assist you with any questions or concerns you may have.
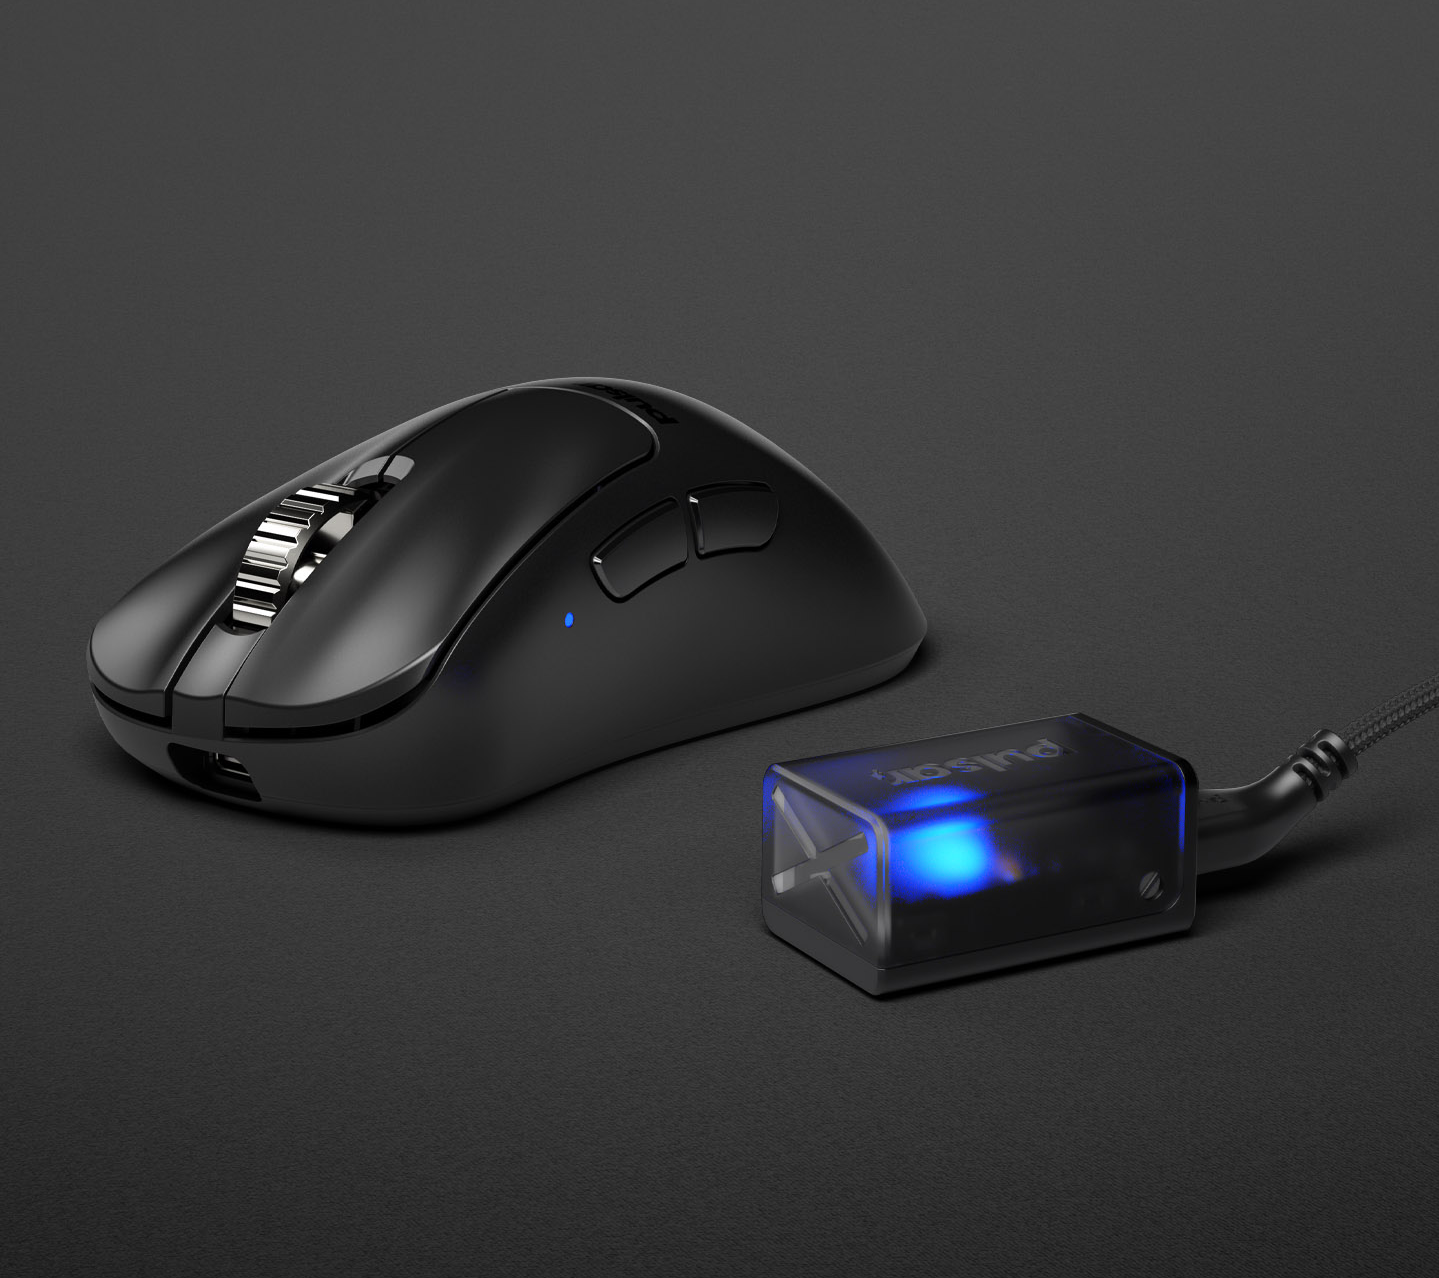
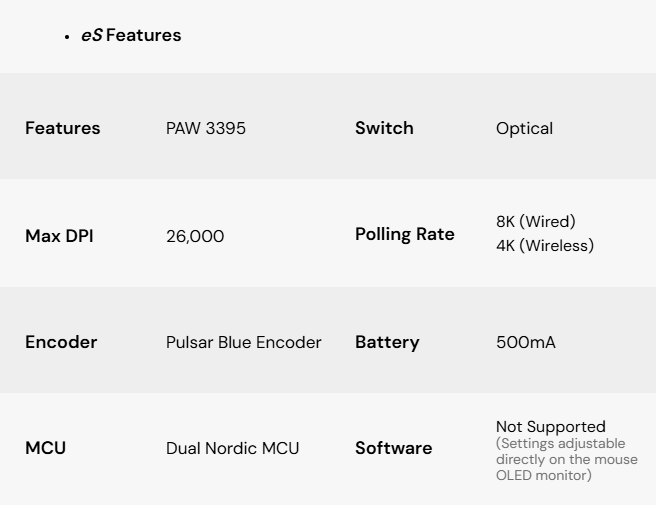
Is there any software compatible with eS models?
No, eS models are designed as mice for use without software.
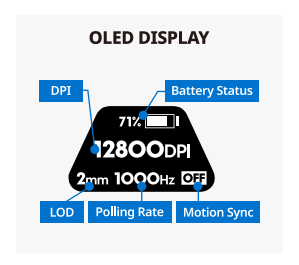
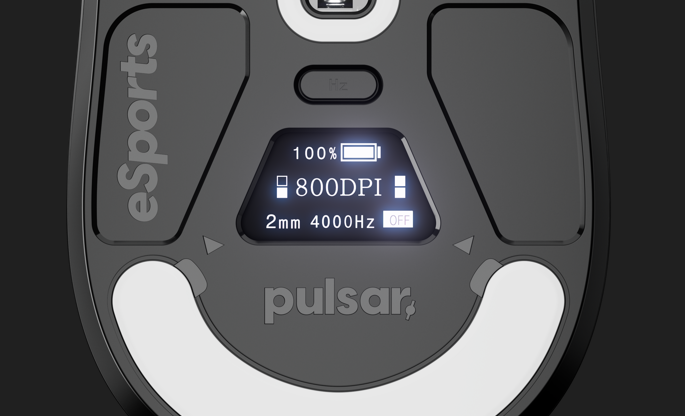
The OLED display on the eS model allows easy monitoring of battery levels and adjustment of key settings, such as LOD, debounce time, motion sync, polling rate, and DPI, using dedicated mouse buttons. This eliminates the need for external drivers.
Additionally, there are no plans for eS software.
How to assign a macro to eS mice?
The eS mice are designed specifically for competition and do not have the option for add macros. However if you are interested there is a way to assign a macro using AHK to buttons.
1. Download AutoHotKey
2. Create an AutoHotKey file
3. Edit using Notepad
4. Paste this code:(left figure)
5. Save as .ahk file
6. Run the file
In this case, the forward button is replaced with "HelloWorld"
Replace "Xbutton2" with the button you wish to use, and "HelloWorld" with the macro you wish to write. For more advanced options, please visit AutoHotKey to learn how to write more advanced AHK codes.
Please note that this is not a recommended use of this mouse, instead, we recommend that you use the regular version of the mouse which has a dedicated macro assigning function and software.
To make the code run on startup, simply paste the file in this location:
C:\ProgramData\Microsoft\Windows\Start Menu\Programs\StartUp
Here are other example of Macros you can create:
- Forward button hold --> Ctrl hold(right figure)


How to Deactivate the Side Buttons on Your X2A eS Mouse
If you're looking to deactivate the side buttons on your X2A eS mouse, there are two simple methods you can use:
Using the Side Button Cover:
The X2A eS comes with a side button cover that can be attached over the buttons. This cover will physically block the buttons from being pressed while still allowing you to use the mouse as normal.
Disabling via Mouse Settings:
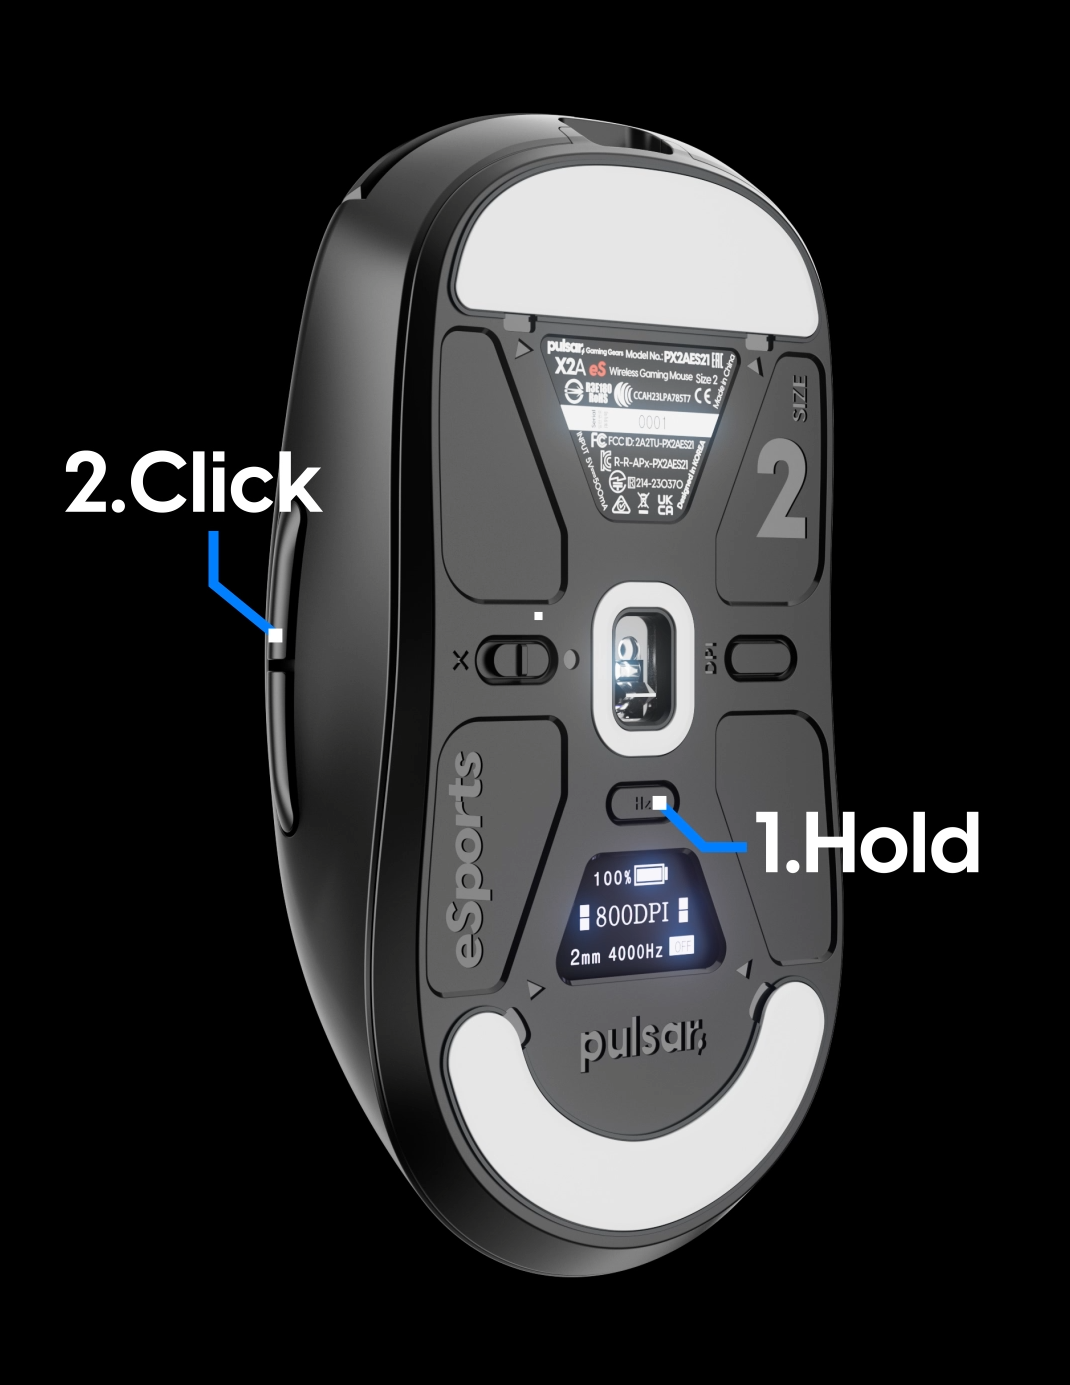
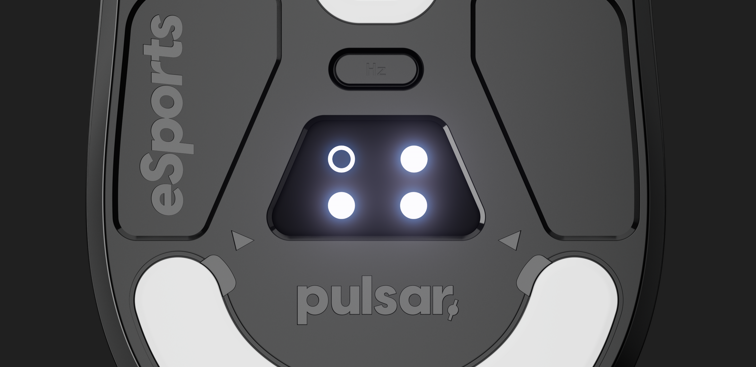
Another way to deactivate the side buttons is by using the polling rate button.
To do this, press and hold the polling rate button, then click on the side button you want to deactivate.
The button will be disabled and will appear blank on your screen.
By following either of these steps, you can easily customize your X2A eS mouse to suit your needs.
Firmware update required: Download and update the attached firmware in order to use the corresponding function.
Need Help?
If you have any questions or run into any issues while trying to deactivate the side buttons, don't hesitate to contact our customer support team. We're here to help you get the most out of your X2A eS mouse.
exeX2A_eS_Firmw...(4.36 MB)
Keyboard & Accessories
General
What is Red Switch?
Best for rapid keystrokes and fast paced gaming and typing fast action with minimal resistance without a tactile bump.
- Repulsive
- Quiet sound
- Smooth press without any bumps
- Fast action with minimal resistance
- Quality, 50 million stroke durability
- LED Backlit, Transparent top.
- Ideal for rapid keystrokes.
- Uninterrupted half-presses
What is Mechanical Keyboards?
Conventional keyboards you can purchase any nearby shops are inexpensive rubber dome keyboards that flooded the keyboard market. Rubber dome keyboards represent over 90% of keyboards in use today and provide an inexpensive but dissatisfying feel and typing experience. It has large sheet of rubber dome with individual springs underneath of each keys.
A mechanical keyboard has individual mechanical switches under each key. It normally provides faster key strokes and more accurate typing experience. But mainly using mechanical keyboards are for the sensation on your fingers. It has many different types of type “feelings” that you can choose from. So you can find perfect fitting keyboard for your personal preference.
What is N-Key Rollover
A keyboard with n-key rollover has the ability to scan each button press individually, as opposed to having the PC do it. As a result, every pressed button, or key, is noted, even if you’re pressing a bunch of keys simultaneously.
Sometimes you'll see the "n" in n-key rollover replaced with a number. That number tells you how many keys you can press simultaneously with the keyboard being aware. For example, if some keyboard says 10-key rollover, this means you can press up to 10 keys at once with successful input. So if it says “n” it means any numbers. So n-key rollover is very high-tech features that not every keyboard has.
If you type fast or can type fast? This is the must function you need.
How can I order a Custom ID Tag for my PCMK Keyboard?
To purchase a customized ID Tag magnet:
- Create a ticket on pulsar.gg/support
- Select "Order Cancel/Edit"
- In your ticket, include:
Full Name:
Address:
Zip Code:
City:
State:
Country:
Phone:
Requested ID text (Max 6 letters):
- Wait for your invoice email and pay it
The shipping fees will range between 15 and 25 USD.
To get an estimation of the cost of shipping to your country, try adding a small product such as Superglide Mouse Feet to your cart on pulsar.gg, enter your shipping address, and you will be shown some prices. (Note: This item can only be shipped from South Korea, if you are in the USA, the item can only be shipped with FedEx or DHL, and the shipping price is around 17 USD)
What is the keycap material?
All keycaps released by Pulsar are made of ABS material, and the Basic keycaps have single-shot + engraved printing, while the Low-Profile keycaps have double-shot (double injection) + laser engraved printing.
What grip tape is compatible with the Xlite V3 and eS?
The Supergrip for Xlite V3 and eS will be available in early 2024. Although all Xlites have the same shapes, the split cutout of the clicks and the enlarged wheel on the V3 make grip tapes from prior versions incompatible with this one. Instead, we would recommend using the Pre-cut Supergrip tapes, or the Un-cut sheet.
XBOARD QS
What is QMK Firmware?
The QMK firmware, or Quantum Mechanical Keyboard firmware, is a piece of software that controls the operation of mechanical keyboards. It allows users to customize and implement various functions and features beyond what a standard keyboard offers.
Developers in the QMK open-source community contribute to the development and maintenance of this firmware. They collaborate to create a versatile platform that enables users to tailor their keyboard experience to their specific preferences. This includes remapping keys, creating macros, adjusting lighting effects, and much more.
In essence, the QMK firmware empowers users to personalize their mechanical keyboards according to their needs and preferences, making it a popular choice among keyboard enthusiasts and professionals who value customization and performance.
How to Update Firmware
XBOARD QS supports QMK, enabling you to freely utilize VIA, Remap, SignalRGB, and Vial functionalities.
- You cannot use these four programs simultaneously.
- Please install and use only one firmware corresponding to the program you wish to use.
- Using multiple firmware corresponding programs simultaneously may result in key malfunctions and conflicts.
- When using VIA or Remap, please make sure to close SignalRGB program completely (including background processes) before usage.
- To use VIA, download the XBOARD JSON file from the Download page and follow the installation steps below.
Supported Firmware
a. VIA (Remap) Firmware
b. Signal RGB + VIA (Remap) Firmware
c. Vial Firmware
Please visit Pulsar DOWNLOAD CENTER to download above firmware.
1. To update the firmware, install the Firmware Update Toolbox.
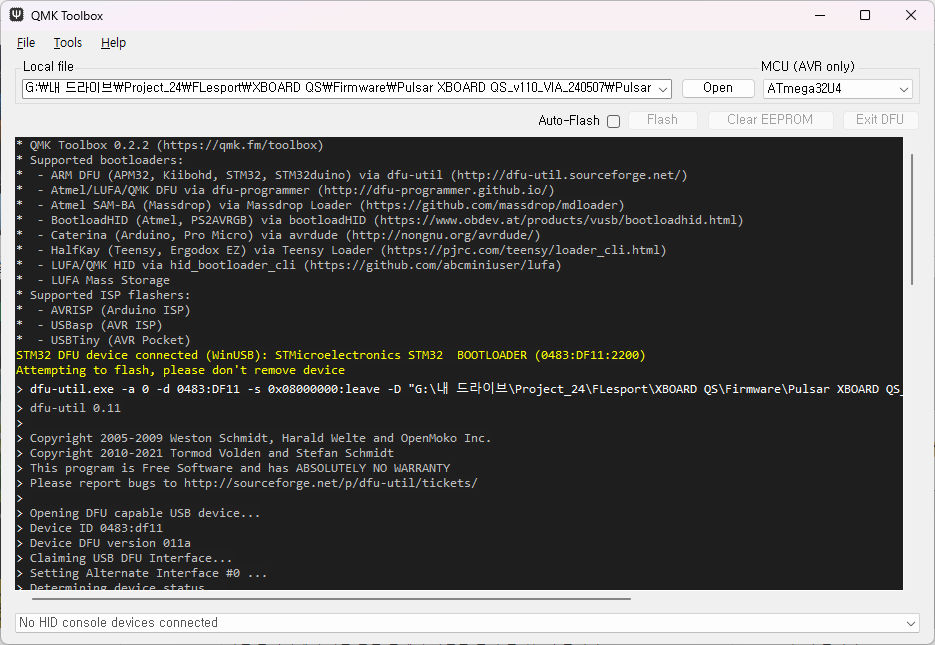
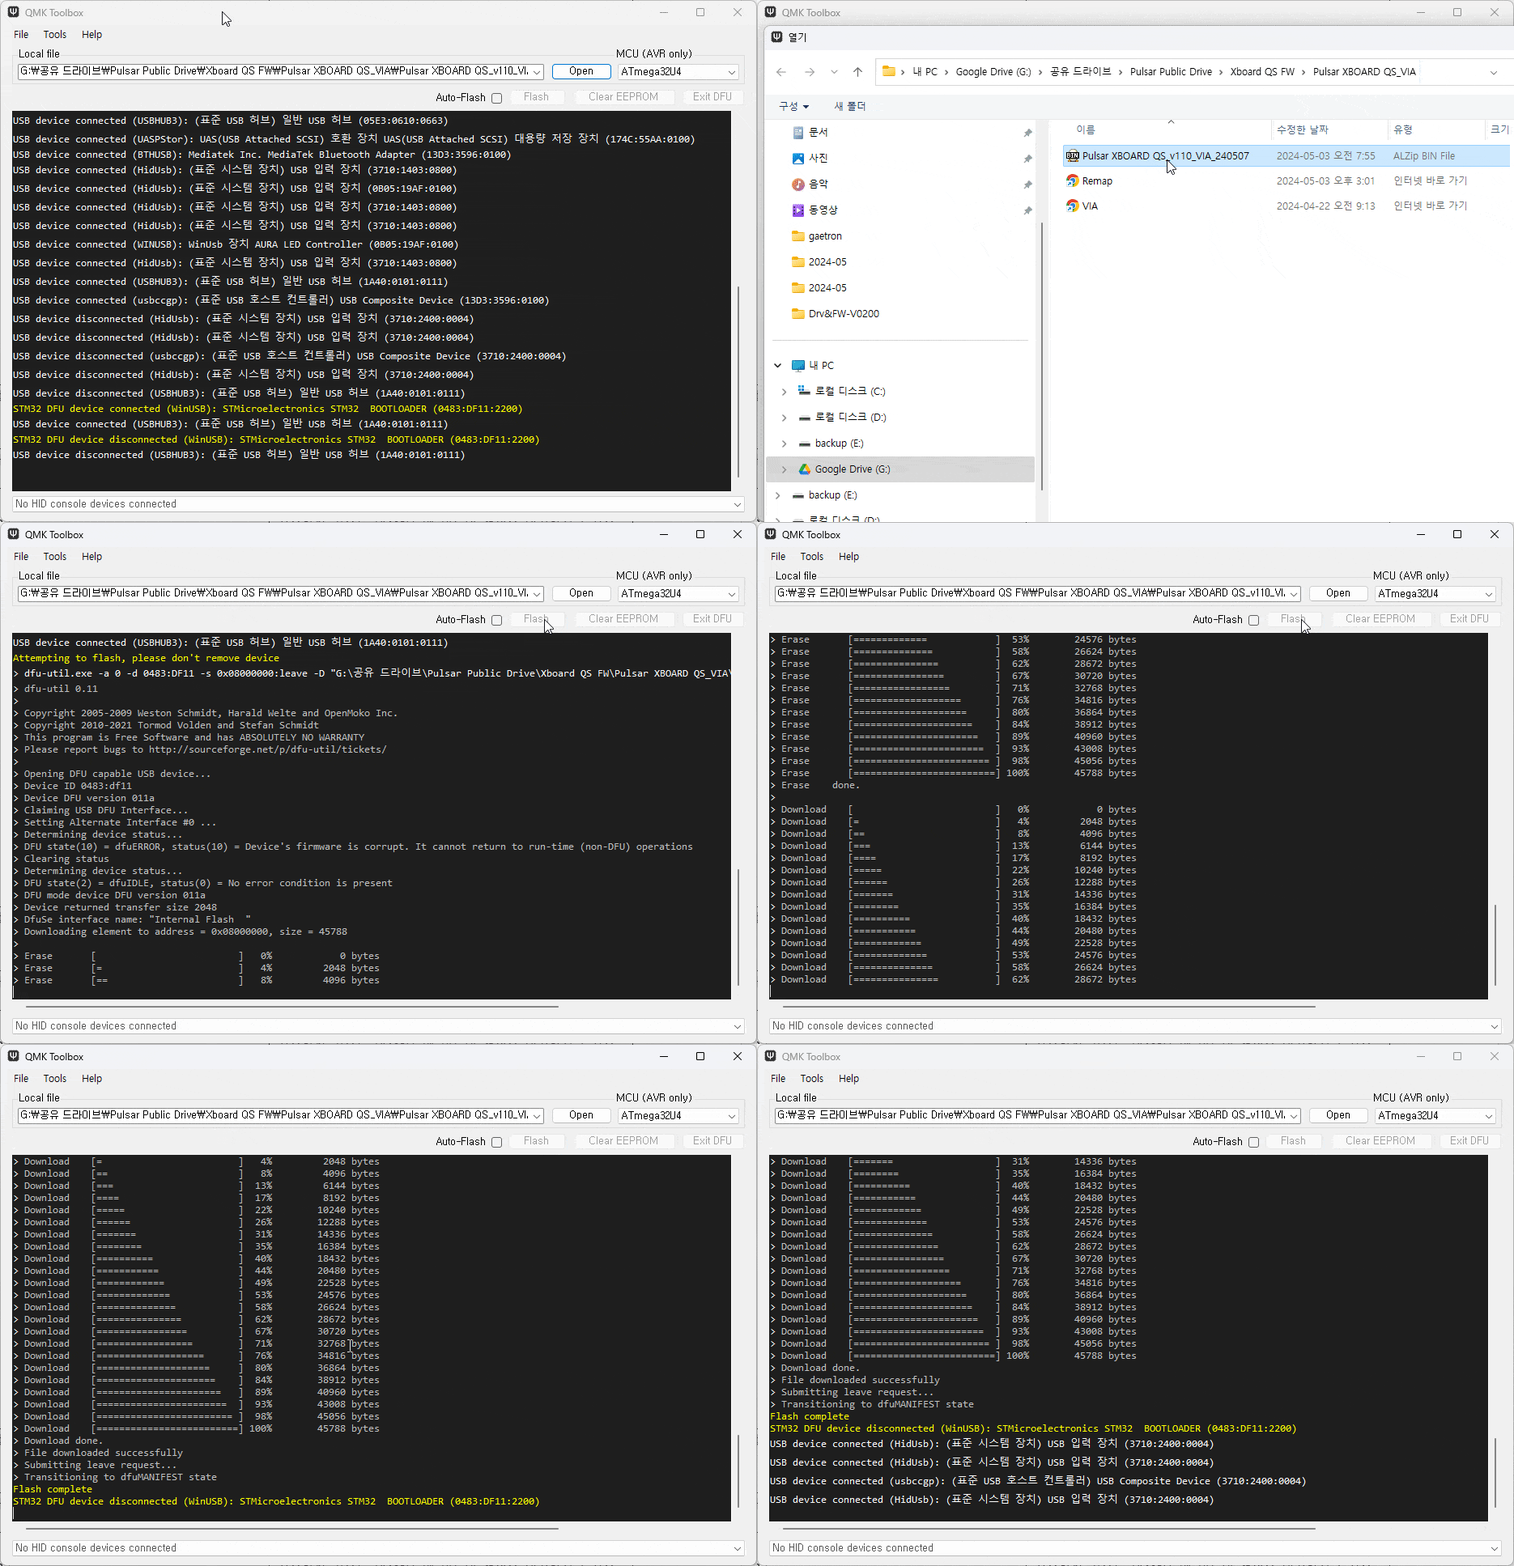
2. Download and run the 'qmk_toolbox_install' and 'Firmware' files from the Pulsar website Download page[link].(Left figure)
3. Click on [OPEN] to open the downloaded firmware file.
4. Disconnect the USB cable connected to the XBOARD QS, then reconnect it to the USB Host 1 Port while holding down the "U" key.
Once the "STM32 DFU Device Connected" message appears, you have entered the firmware update mode.
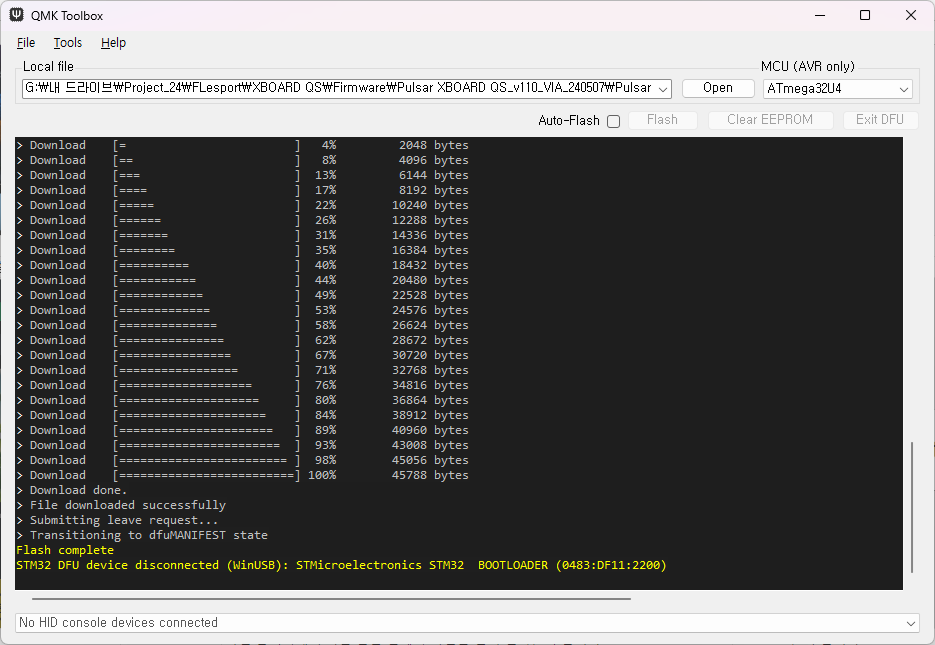
5. Press the [Flash] button when it becomes active.(Right figure)
6. Once "Flash complete" appears, reboot the keyboard.
7. Firmware update is complete.
What is VIA?
VIA is one of the most prominent tools for freely modifying keyboard firmware using QMK Toolbox, a modification tool for QMK-supported keyboard firmware.
VIA is a program designed for programming mechanical keyboards according to user preferences and offers various settings for keyboard layout, lighting, key swapping, and more. It is compatible with keyboards using QMK firmware, allowing users to intuitively and easily customize settings to create their own personalized keyboards.
How to install VIA
To install the desired VIA firmware from the Pulsar keyboard resource center, follow these steps:
https://www.pulsar.gg/pages/download
Caution
• XBOARD QS keyboards support three types of firmware.
• Please install and use only one firmware corresponding to the program you wish to use.
• Using multiple firmware corresponding programs simultaneously may result in key malfunctions and conflicts.
• When using VIA or Remap, please make sure to close SignalRGB program completely (including background processes) before usage.
• To use VIA, you need to download and install the corresponding .json file. Follow the installation steps below.
1. Connect your keyboard and run VIA by clicking on [https://usevia.app/#/]. (*Using VIA is recommended with the Chrome browser.)
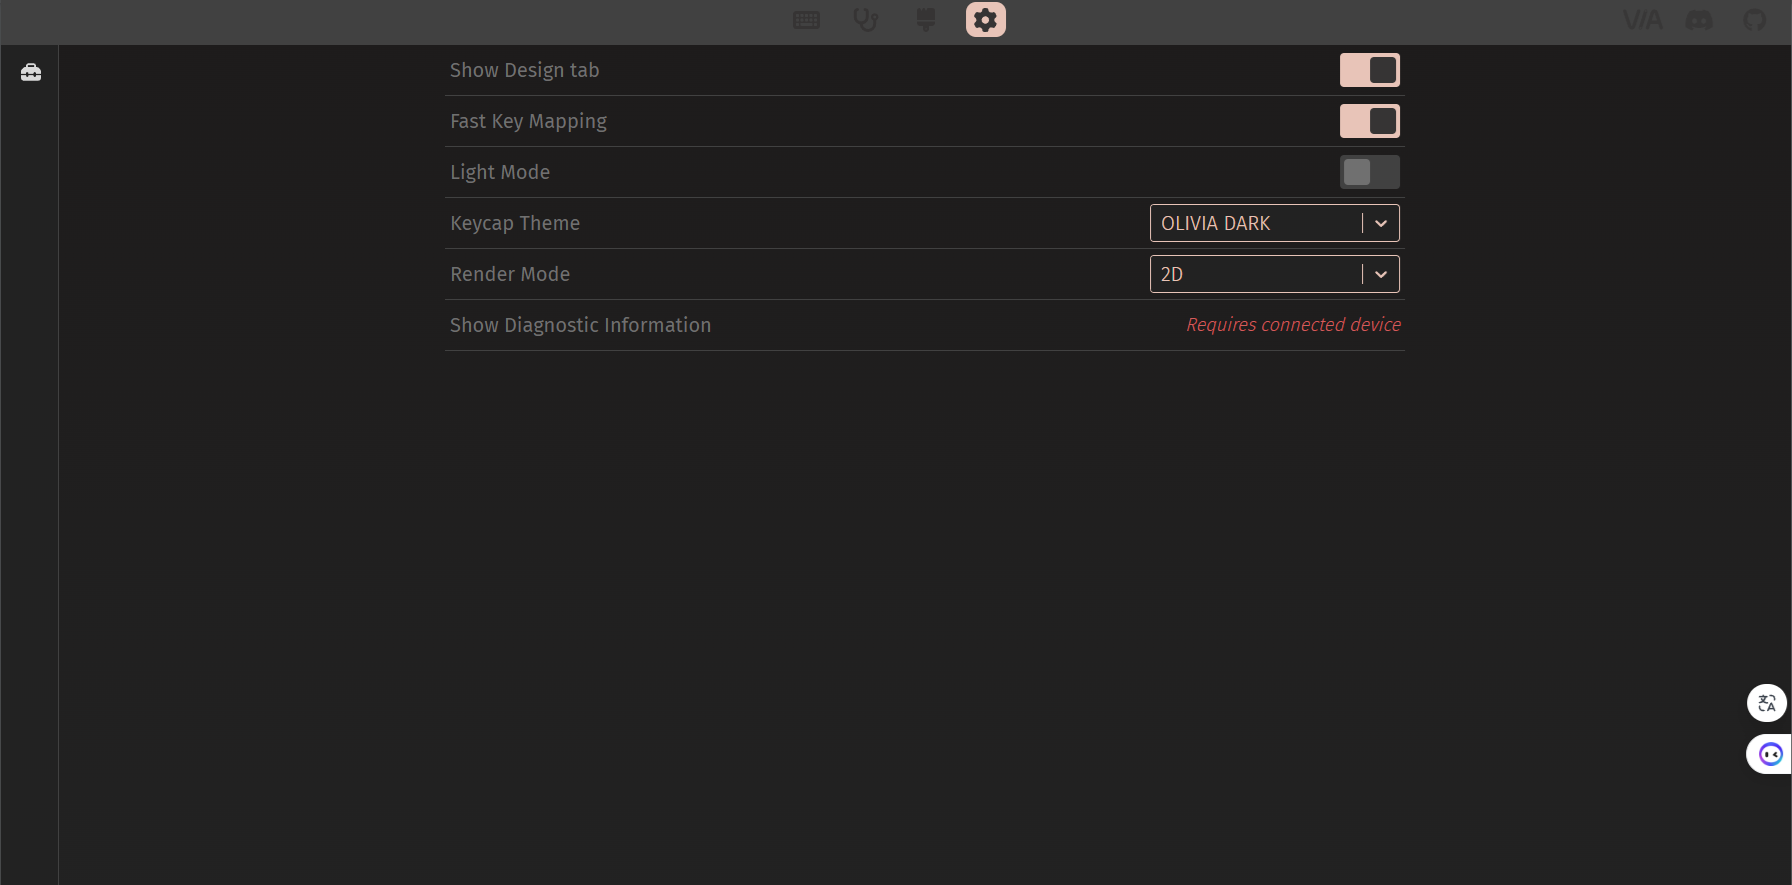
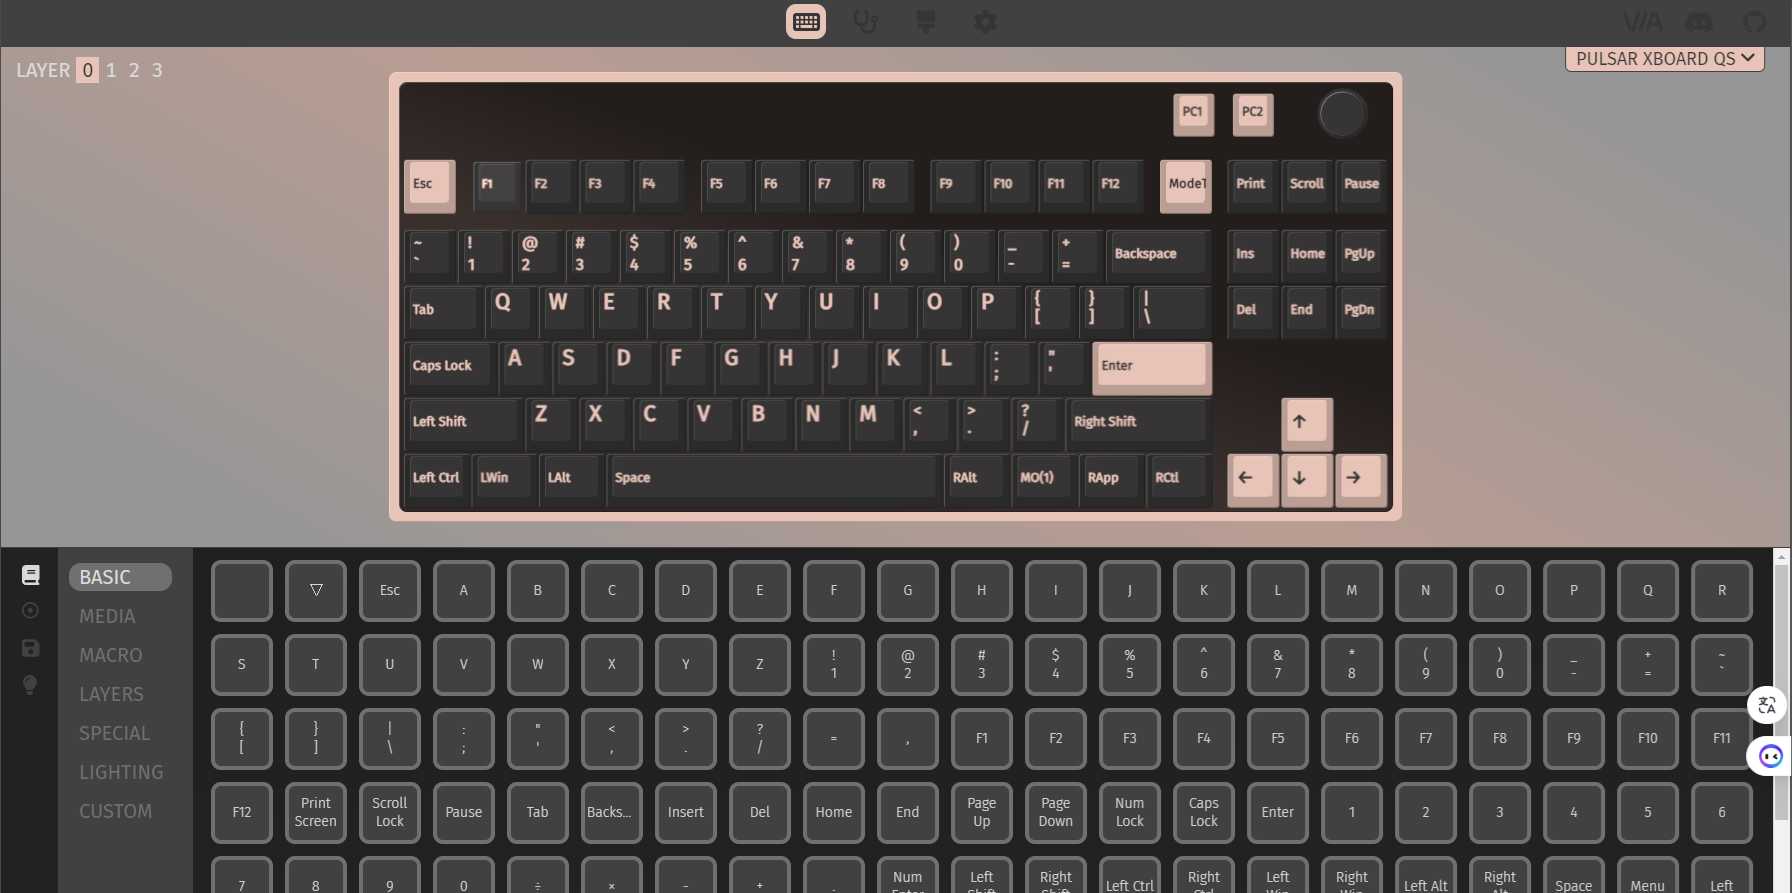
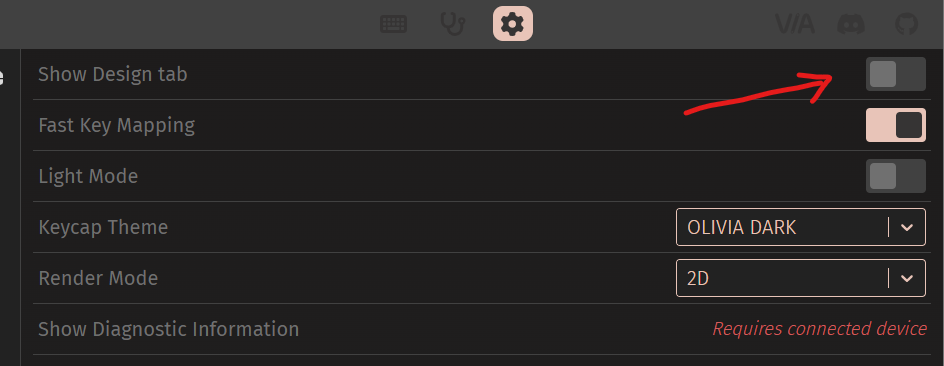
2. Click on the [Settings] tab in the top icon menu and activate the [Show Design tab] menu.(Above Left figure)
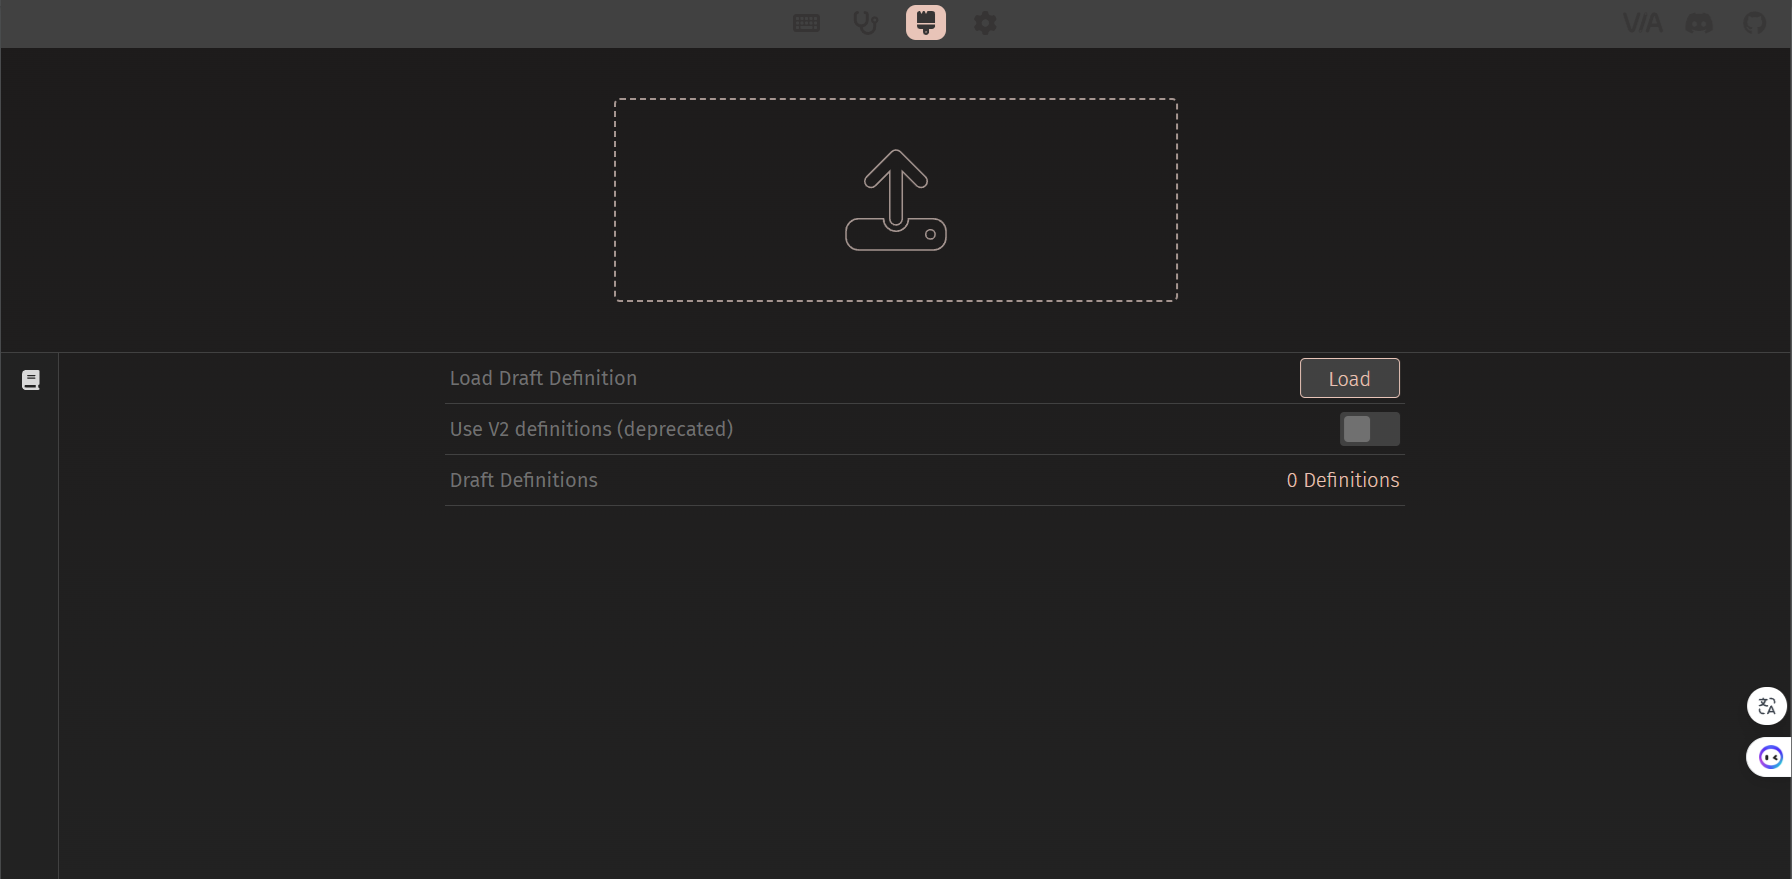
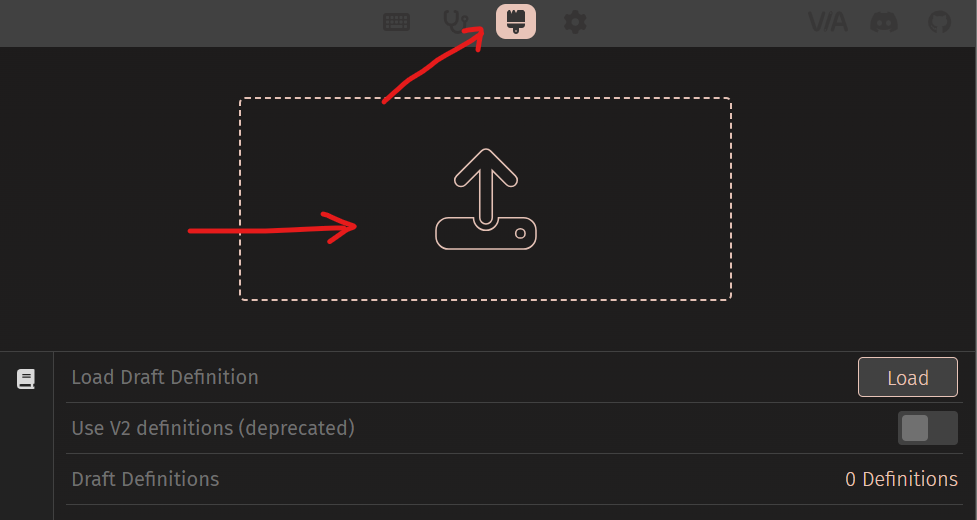
3. Select the [DESIGN] tab from the top icon menu and click [Load] on the screen.(Above Right figure)
4. Select the *.JSON file from the folder where you downloaded the firmware.
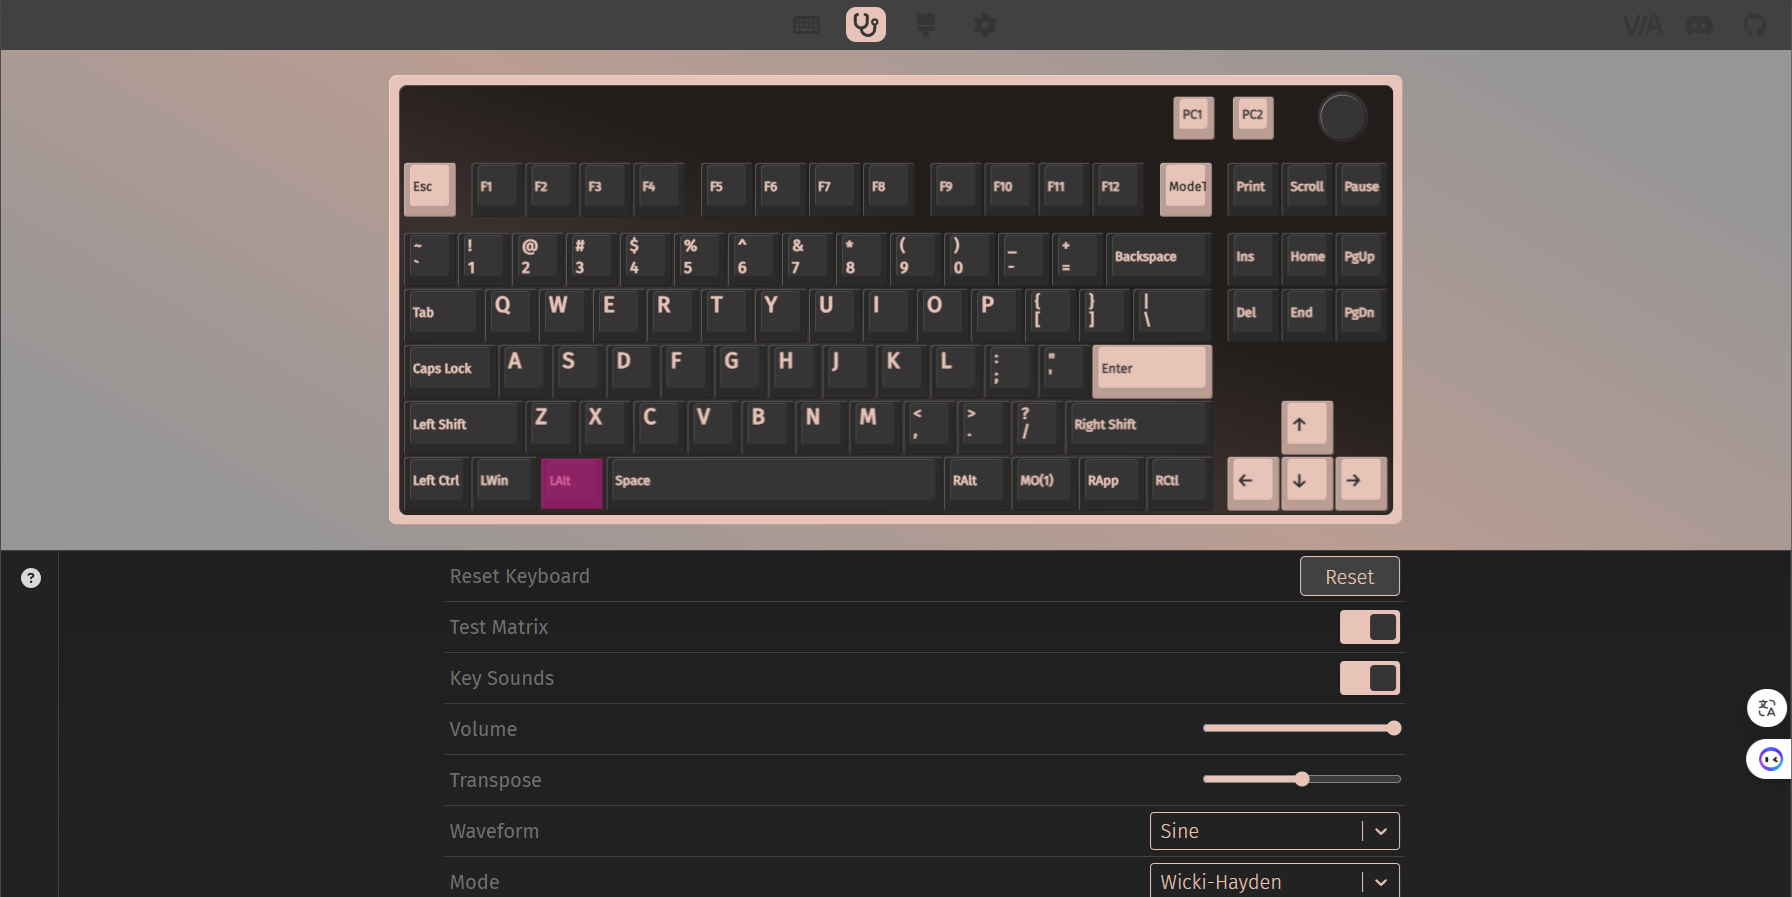
5. Select "Configure" to complete the installation of the *.JSON file. It will be displayed as shown in the image below.
6. Select the [Keyboard] tab from the top icon menu and click the [Authorize device+] button.
7. When the pop-up window appears, select [Pulsar XBOARD QS] and connect.
8. Once the connection is successfully completed, it will be displayed as "[Pulsar XBOARD QS - Paired]" and the Xboard QS Layer image will appear as shown below. You have now completed all the installation steps for using VIA. (*The JSON file needs to be registered only once during the initial installation. If connecting to another PC, the JSON file needs to be registered again.)(below 2 figures)
Please refer to the VIA manual instructional video here: https://www.caniusevia.com/docs/whats_new
What is SignalRGB?
SignalRGB is a free app-based integrated RGB LED system that synchronizes multiple RGB-controllable devices into one RGB, allowing users to freely customize settings.
How to Install SignalRGB
To use SignalRGB, the corresponding firmware must be installed.
Select and download the SignalRGB firmware you wish to use and install it. [Caution]
- XBOARD QS keyboards support three types of firmware.
- Please install and use only one firmware corresponding to the program you wish to use.
- Using multiple firmware corresponding programs simultaneously may result in key malfunctions and conflicts.
- When using VIA or Remap, please make sure to close SignalRGB program completely (including background processes) before usage.
- Select and download the desired [SignalRGB firmware] for installation. (Refer to FAQ for firmware update)
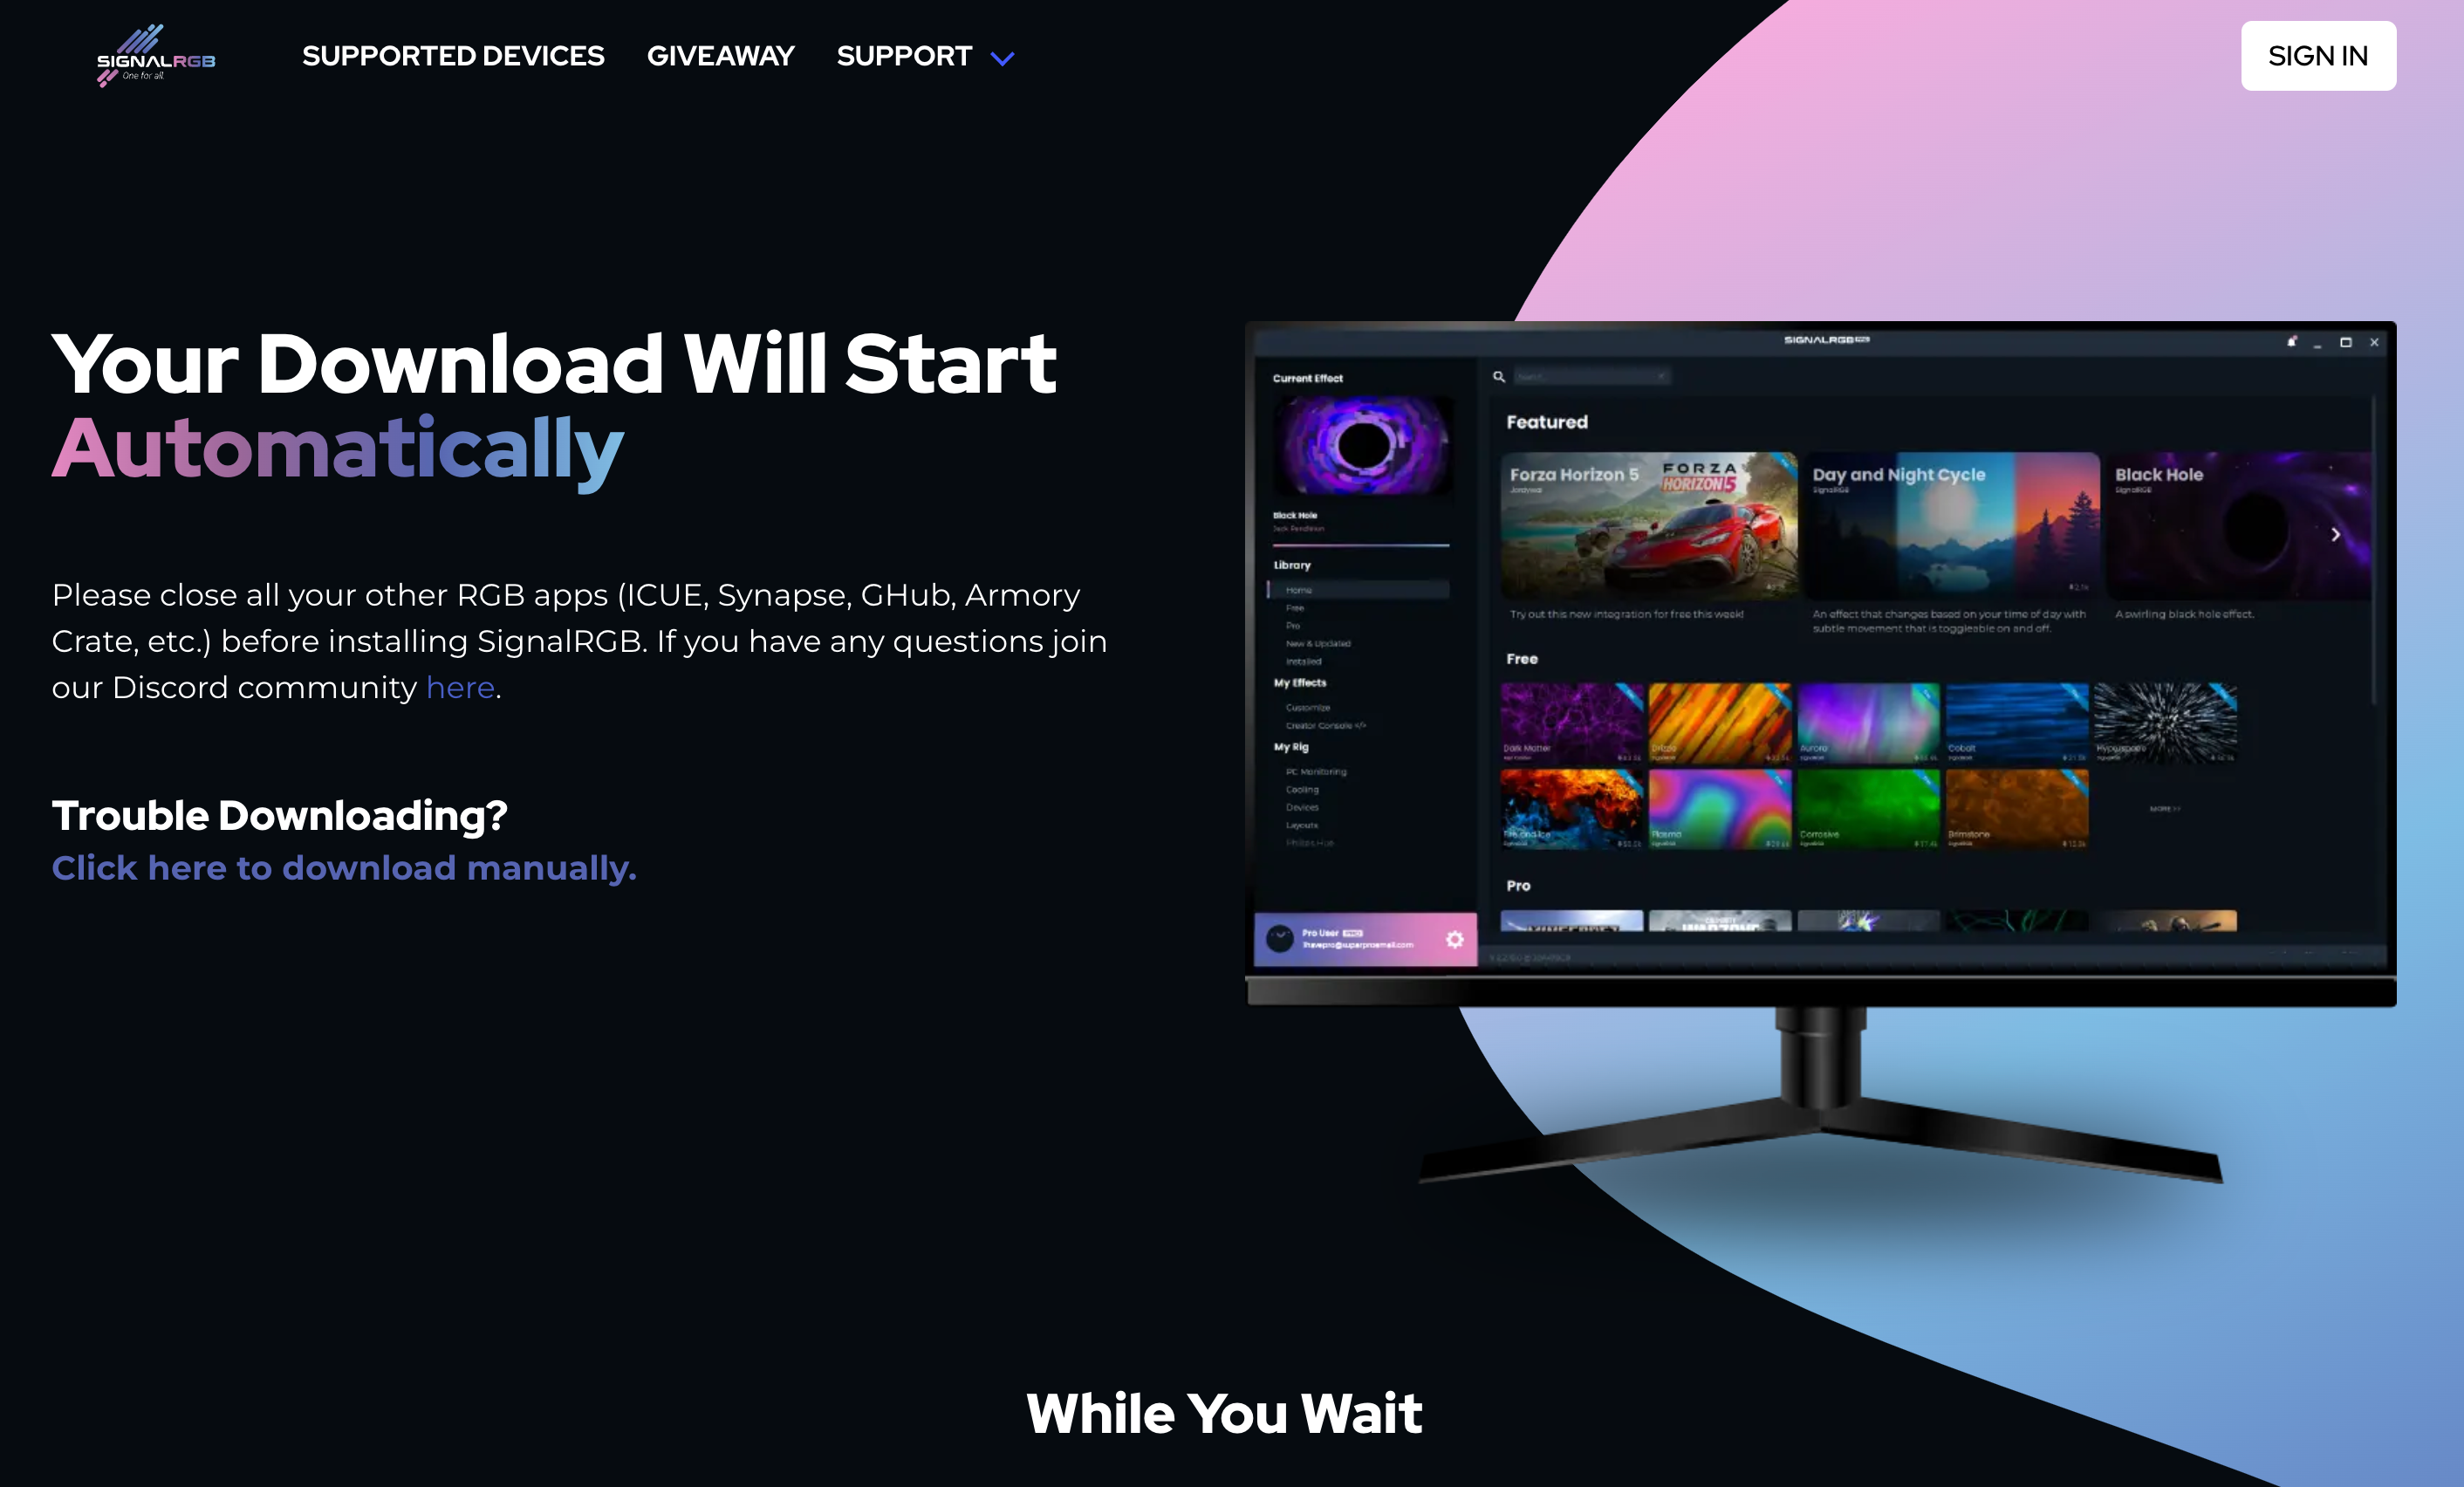
1. Click on the [Click here to download manually] link on the SignalRGB website to download the installation file. [https://signalrgb.com/download/] (Left figure)
2. Run the downloaded "Install_SignalRgb.exe" file to begin the installation.
3. Once the installation is complete, run SignalRGB and select "Allow" for the Windows security prompt.
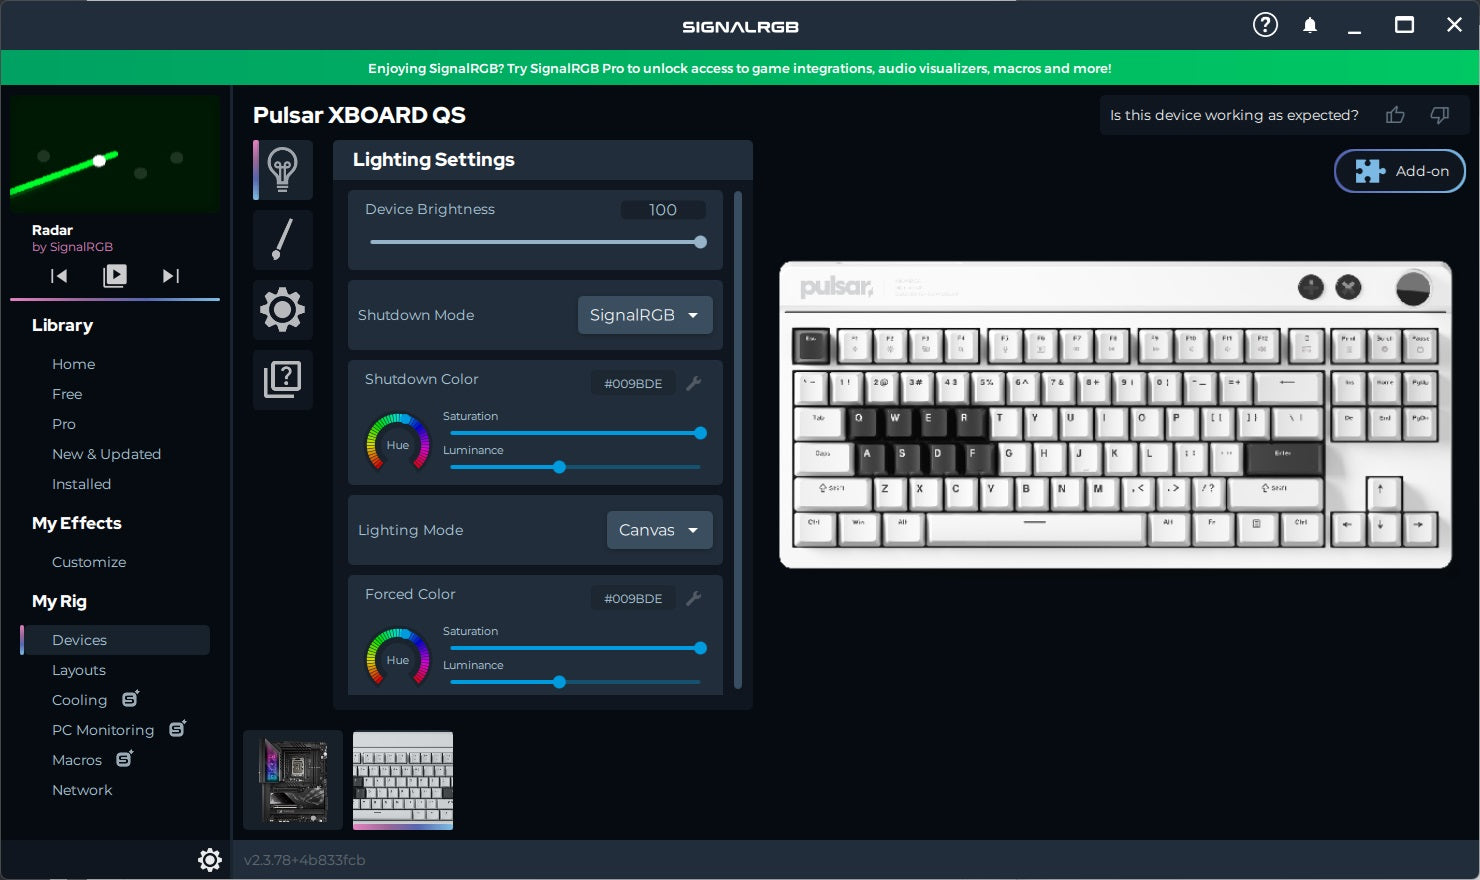
4. In the "My Rig" menu, click on "Devices" and select the XBOARD QS image displayed in the list of devices on the right-hand side.(Right figure)
5. Installation is now complete. Please feel free to customize the settings according to your preferences.
For instructions on how to use, please refer to the tutorial video: https://docs.signalrgb.com/gettingstarted
What is Vial?
Vial is a powerful, open-source software designed for configuring mechanical keyboards in real-time. It offers a graphical user interface (GUI) that is compatible across different operating systems such as Windows, Linux, and Mac. Vial is based on QMK firmware and provides extensive functionality for customizing keyboard layouts and features, making it a popular choice among keyboard enthusiasts and professionals.
How to inatall Vial
To use Vial functionality, the corresponding firmware must be installed.
Select and download the Vial firmware you wish to use and install it.
CAUTION
• XBOARD QS keyboards support three types of firmware.
• Please install and use only one firmware corresponding to the program you wish to use.
• Using multiple firmware corresponding programs simultaneously may result in key malfunctions and conflicts.
• If you were previously using a different firmware, please uninstall that firmware before installing the Vial firmware.
• Select and download the desired [Vial firmware] for installation. (Refer to FAQ for firmware update)
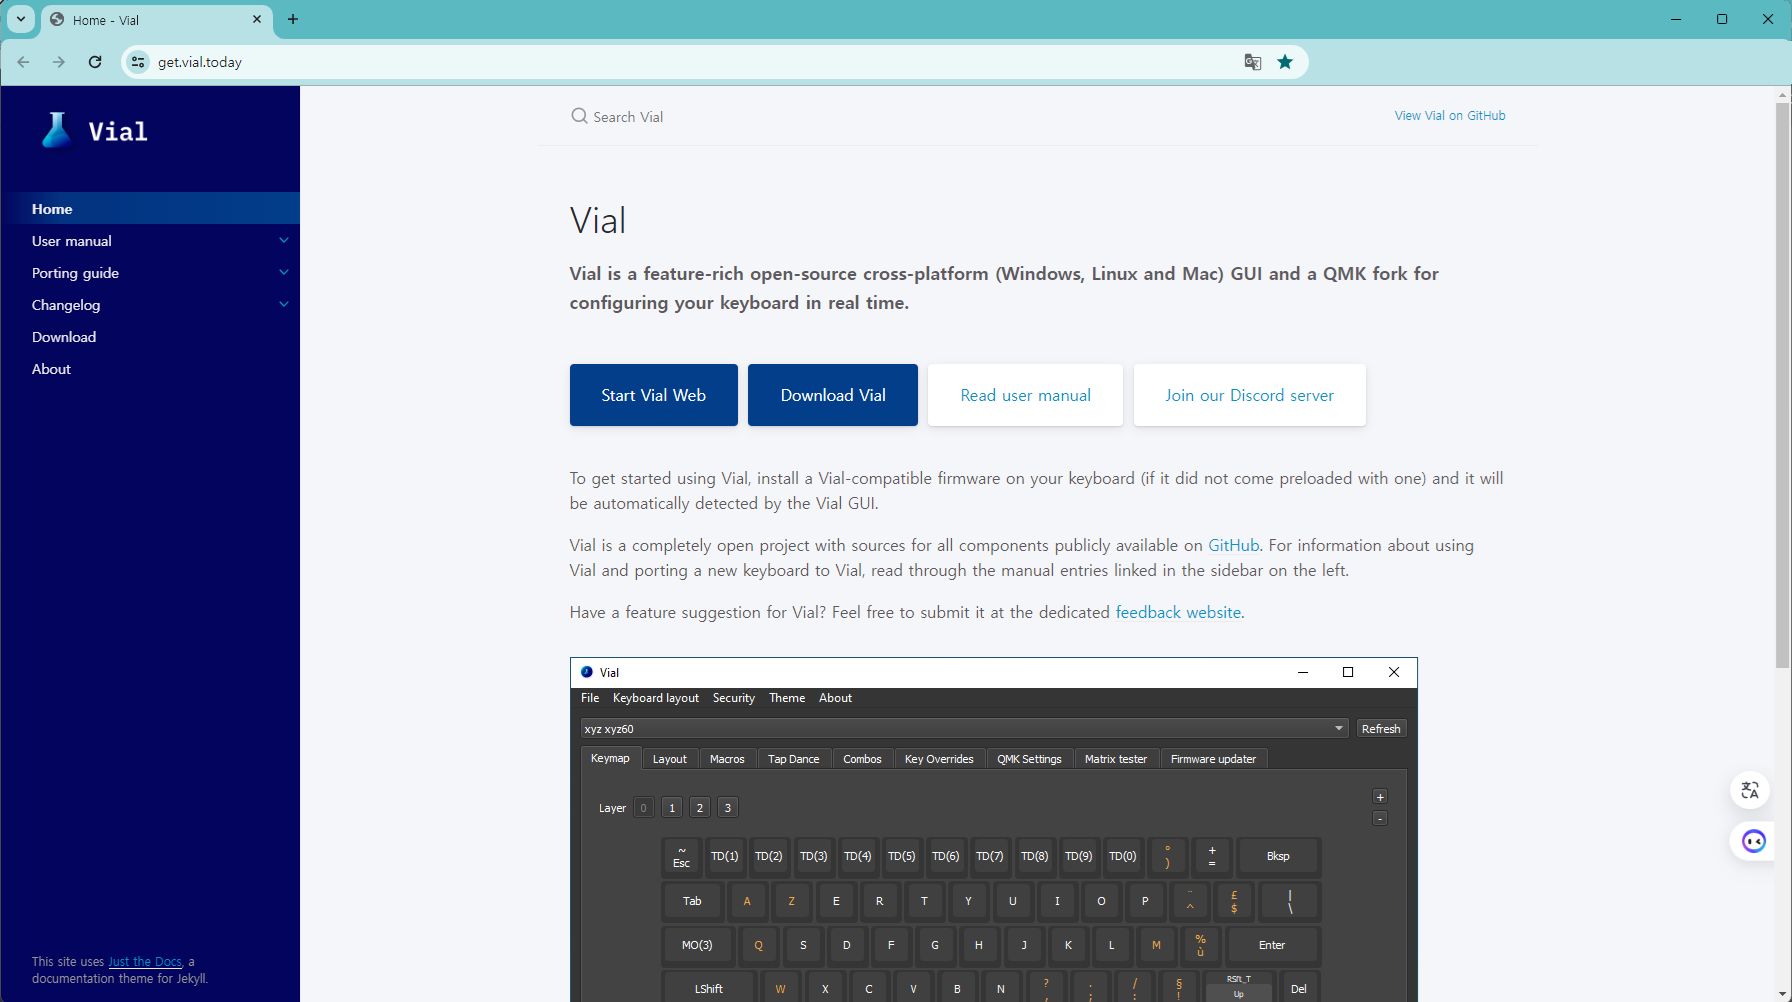
1. Visit the Vial website and click on [Start Vial Web].(Left figure)
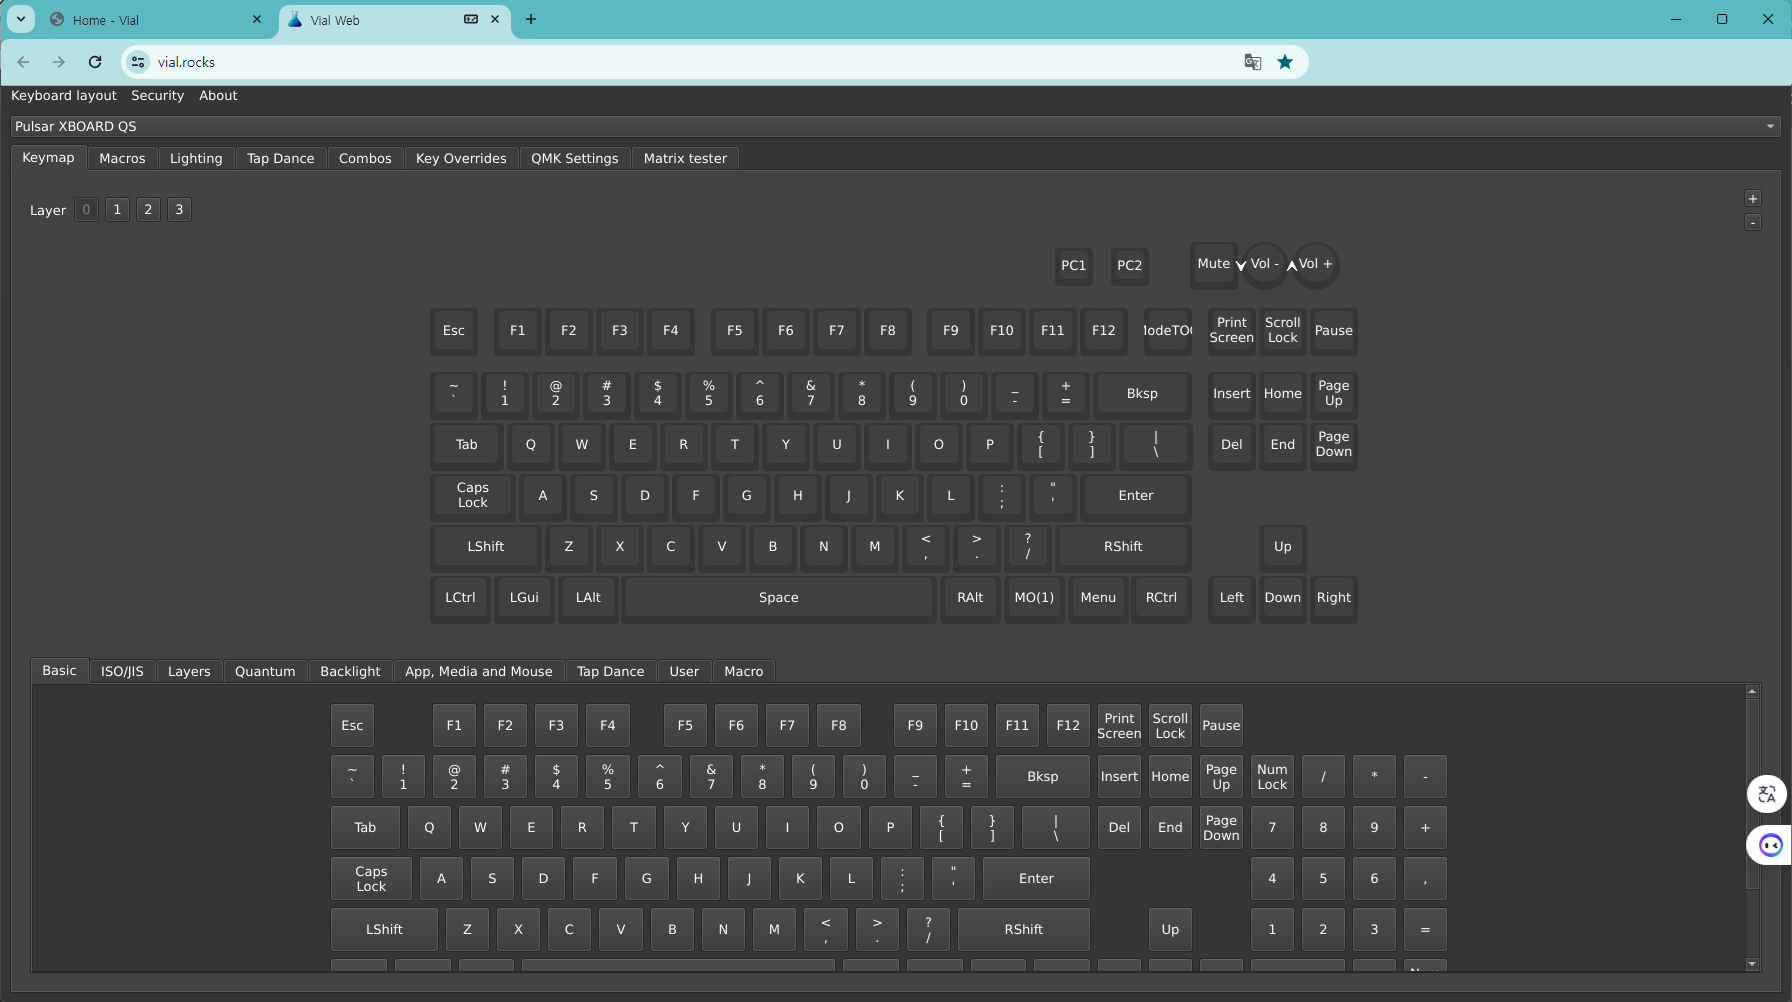
2.When the pop-up window appears, select the Xboard QS device and click "Connect.
3. Once the key layout image appears, the connection is complete.(Right figure)
Please refer to the usage instructions here: https://get.vial.today/manual/
My keyboard is not recognized by the computer. What should I do?
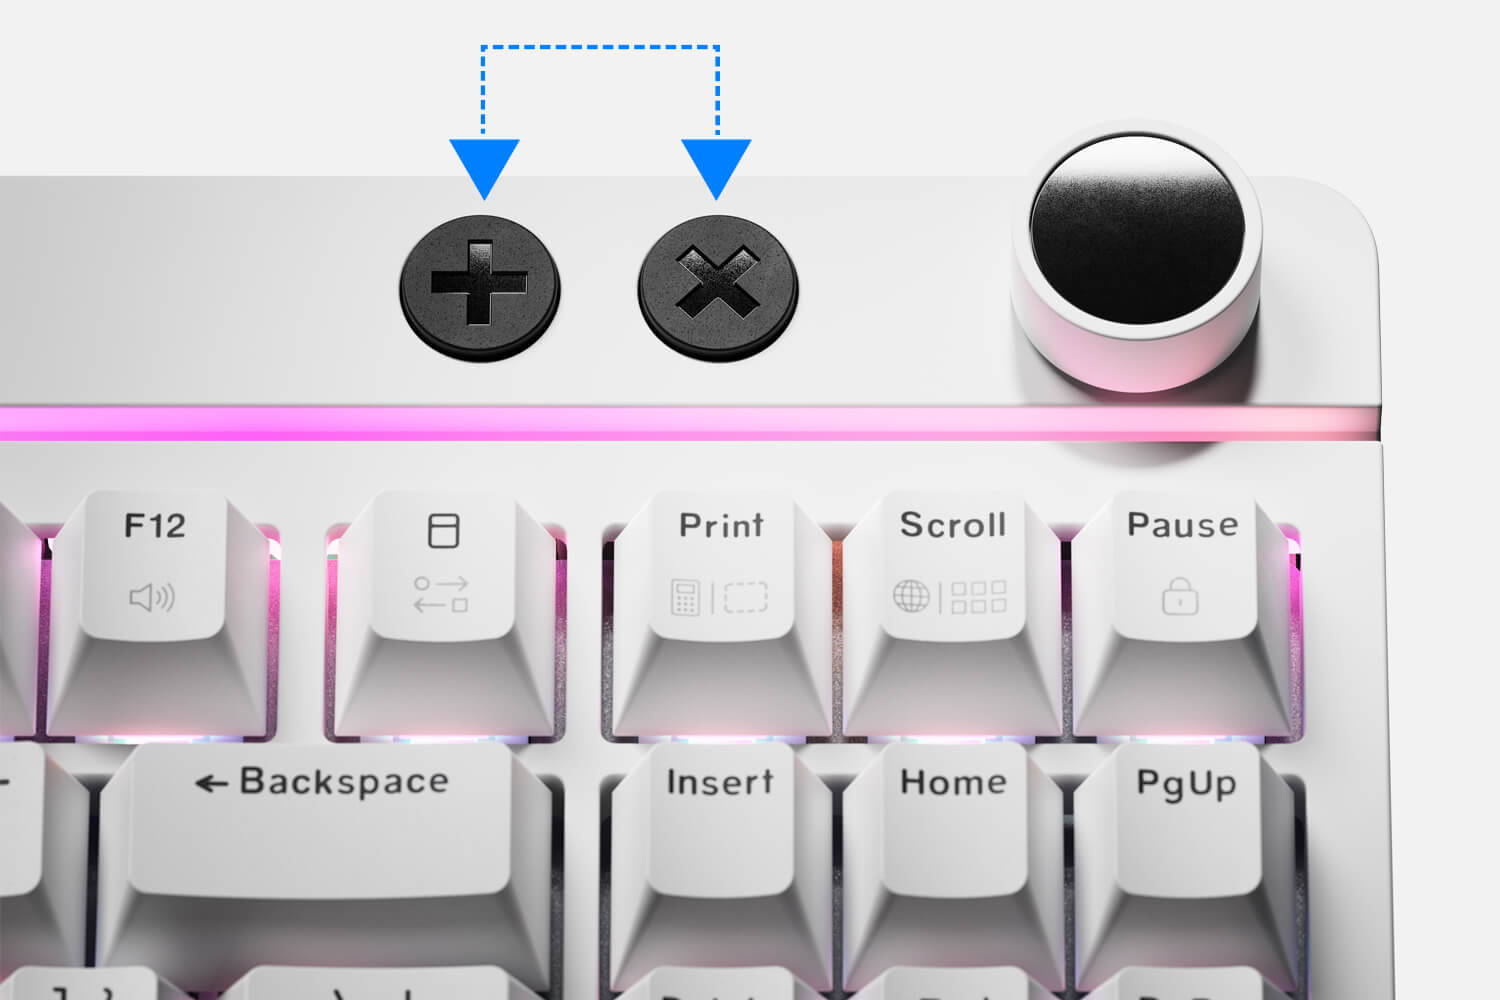
Check the output ports PC1 and PC2 on the XBOARD QS.
Adjust the output source accordingly.
Use the keyboard + or X keys to make the necessary changes.
My WIN key is not working. What should I do?
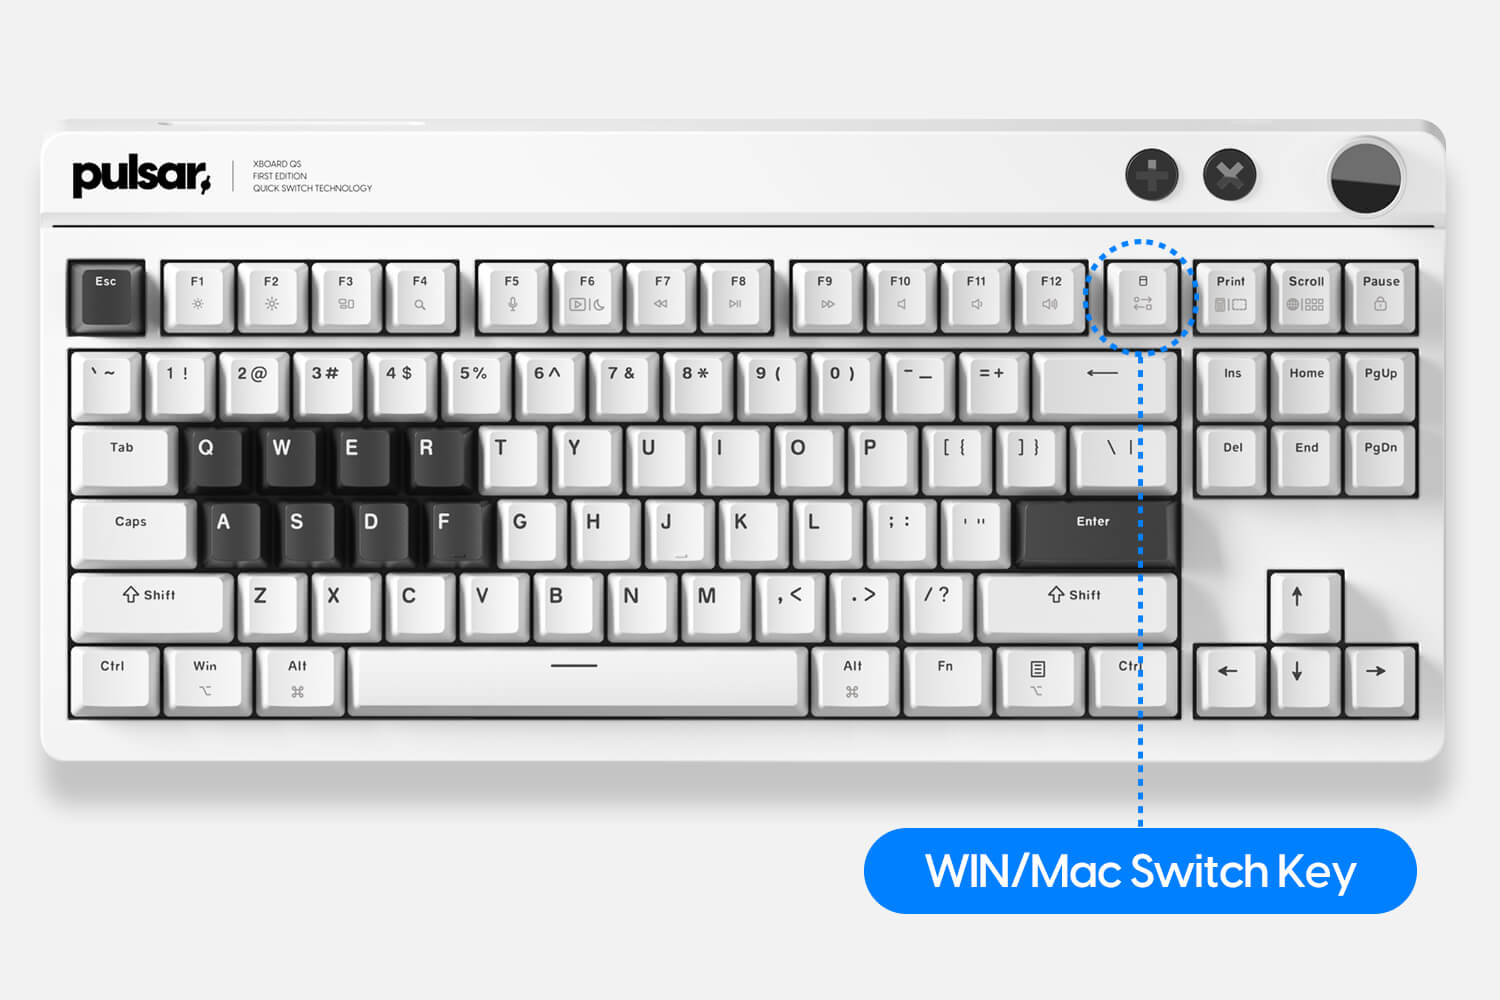
Please check if the WIN key is in Lock mode. If the WIN key is solid white, it is in Lock mode.
Alternatively, check if the XBOARD QS is in MAC mode.
To switch between WIN and MAC modes, press the WIN/MAC key. The mode will toggle each time you press it.
In WIN mode, the LED will be BLUE, and in MAC mode, the LED will be RED.
XBOARD QS is not supported in SIGNALRGB. What should I do?
To support SIGNALRGB, you need to upgrade the keyboard with the dedicated firmware available in theDOWNLOAD page.
My stored macros are not outputting correctly. What should I do?
This may be due to the characteristics of programs like NOTEPAD. Try running them in WORDPAD or another program.
For Dynamic Macro to work properly in NotePAD, please update the firmware to version 1.1 or higher.
How do I upgrade the firmware?
We support keyboard firmware upgrades using QMK Toolbox.
1. Install and launch QMK Toolbox.
2. Disconnect the keyboard USB cable (both PC1 and PC2).
3. Connect the keyboard to PC1 while holding down the "U" key.
4. Release the "U" key.
5. The keyboard will enter BOOTLOAD mode.
6. Download and extract the provided firmware file, then click "Open" and select the file (xxxx.bin).
7. Click "Flash" to start the upgrade process.
8. Once the firmware upgrade is complete, the keyboard will automatically reset.
9. To reset to default settings, press and hold FN + ESC for more than 3 seconds.
Important: DO NOT DISCONNECT THE USB CABLE UNDER ANY CIRCUMSTANCES. This could cause the keyboard to malfunction or become unusable.
Do you support hardware macros?
Yes, we support hardware macros, also known as Dynamic Macros. These can be stored on up to 2 keys (1 and 2).
Dynamic Macros are temporary and will be lost if power is turned off. They are designed for quickly saving and immediately using macros:
1. Press "FN+1" and wait for ~ to blink to indicate it's ready to store.
2. Enter the desired keys and press "FN+~" to save.
3. To execute the macro stored on key "1", press "FN+3". Likewise, the execution key for "FN+2" is "FN+4".
Can I connect an external hard drive to the USB port?
This product supports USB 2.0, 5V/500mA. Therefore, if you intend to use an external hard drive, please ensure it has its own power source connected before use.
Do you support Linux?
Yes. We support Linux.
What web browsers support VIA?
Web browsers that support the WEB HID standard are continuously being updated.
Currently, VIA is supported on Chrome and Edge.
Please install the appropriate browser for your operating system and use it.
What devices can be connected to the USB input port?
The USB input port supports all devices typically used with a PC's USB port. This includes (but is not limited to) devices such as mice, wireless dongles, USB drives, USB headsets, USB joysticks, etc.
However, for devices that require more than approximately 100mA of power, such as external hard drives, please use external power sources.
Can the switches be replaced?
This product features hot-swappable switches.
You can replace them with your preferred mechanical switches. When replacing the switches, please disconnect the keyboard's USB connection.
What is the maximum capacity of Dynamic Macros?
Dynamic (hardware) macros support up to 64 characters.
Additionally, macros stored during power-off or in sleep mode will be erased.
These macros are designed for immediate storage and instant use.
For larger capacity macros that are not lost during power-off, please use the VIA or Vial program.
My keyboard is not recognized on the VIA site.
The XBOARD QS was released recently and is currently not listed on the default keyboard list on VIA, so you need to add the keyboard manually.
First, download the keyboard file (Json file) from this link: DOWNLOAD
In VIA, in the settings tab, select "Show Design tab"(Left figure)
In the design tab, click on the upload button, and select the keyboard file (Json file) that you downloaded in the first step.(Right figure)
You can also change settings directly on the keyboard using buttons and shortcuts, make sure to follow the instructions on the user manual (Click here to download) or on this tutorial video: https://www.youtube.com/watch?v=yh5taOChWpE&pp=ygUJeGJvYXJkIHFz
Please note:
Only one of VIA, remap, vial, or sRGB can be connected at a time.
Please close any unused programs.
Also, make sure the correct firmware is applied and check if it matches one of the three types available.
Order & Shipping
What should I do if I forgot my login password?
If you forgot your login password for Pulsar.gg, don't worry, there are a few steps you can take to regain access to your account.
Firstly, you can try clicking on the "Forgot my password" link on the login page. This will prompt you to enter the email address associated with your account, and you will receive an email with instructions on how to reset your password.
If this does not work, you can send an email to support+login@pulsar.gg explaining your situation and requesting assistance with resetting your password. The website technical support team will respond promptly and guide you through the necessary steps to regain access to your account.
Any updates on my order?
To check the current status of your order, there are two solutions:
1. Go to account.pulsargg.eu and log in with the email you used when making your order.
Or
2. Find your order confirmation email, and click on View Order
How to Receive Notification When a Product is Restocked
At Pulsar, we understand the frustration of finding out that the item you want is out of stock. We apologize for any inconvenience this may cause. However, we want to make it easy for you to know when the product is restocked. Here's how:
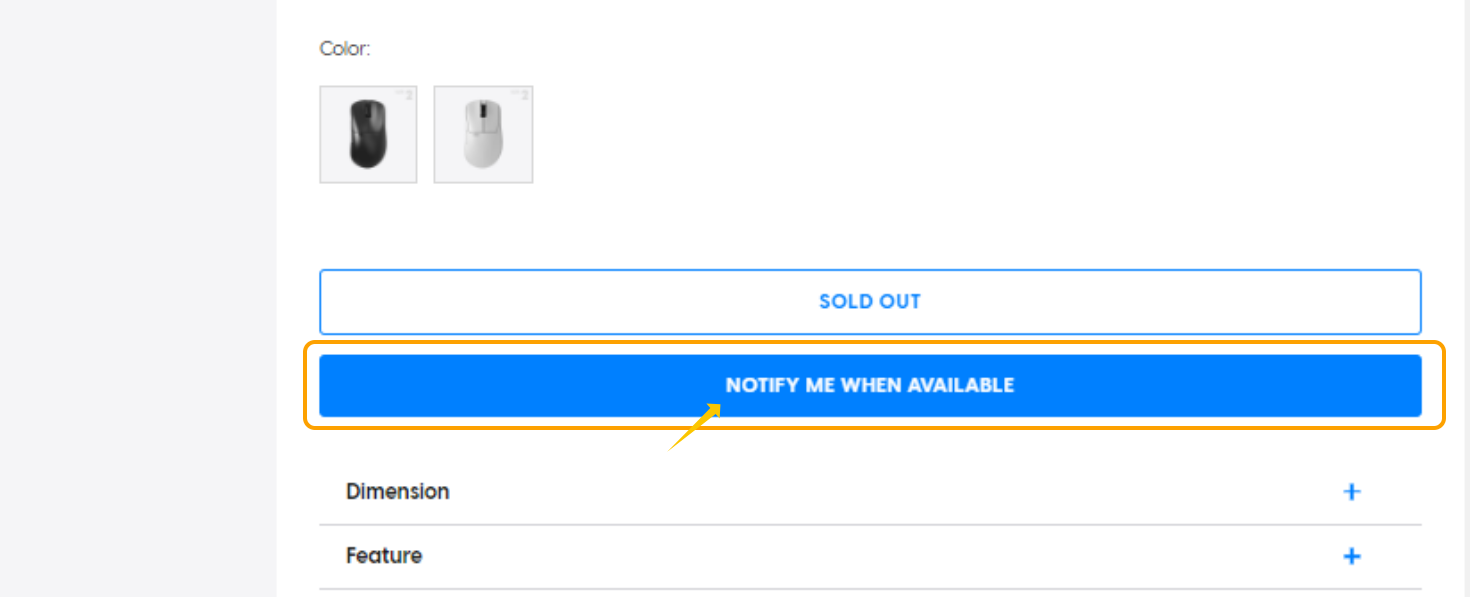
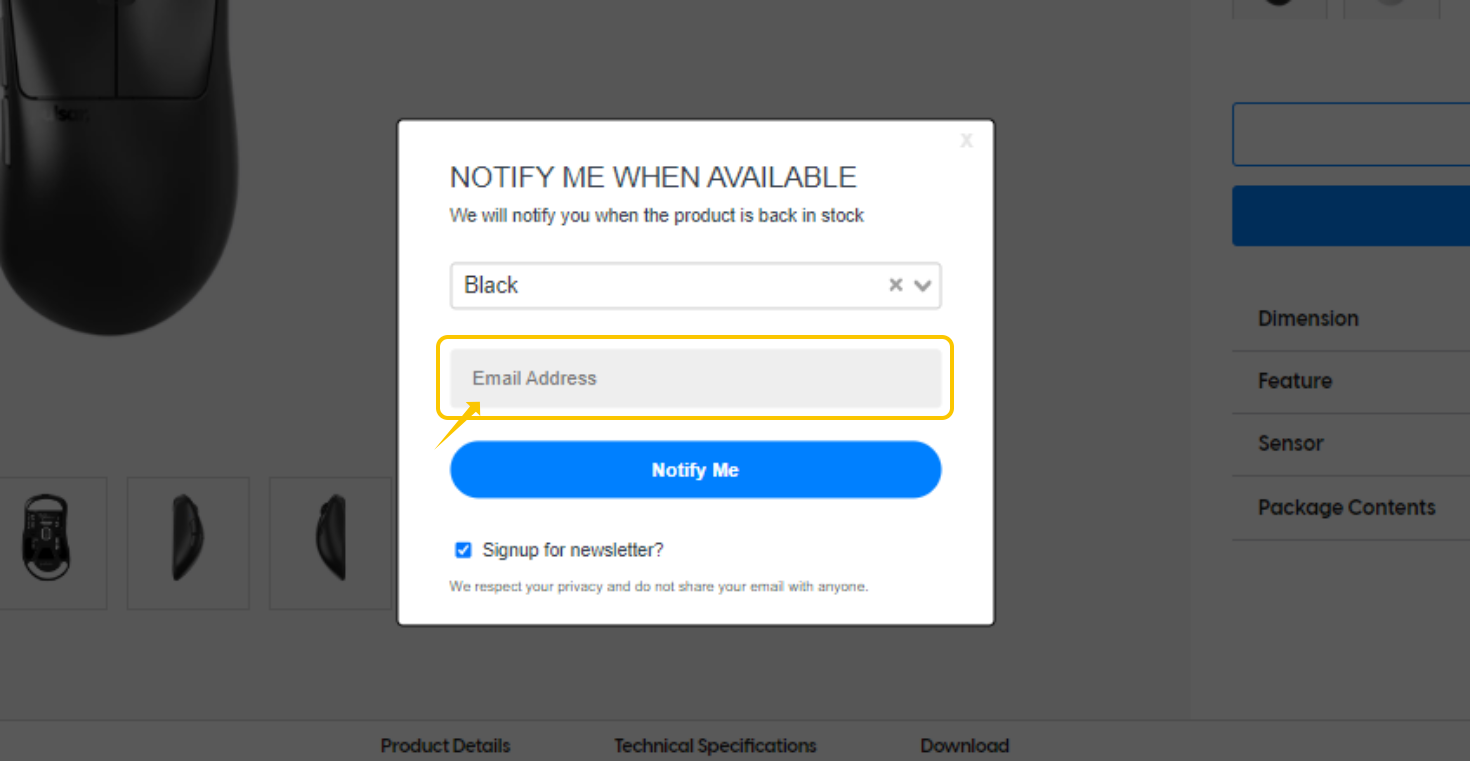
1. Click on the "NOTIFY ME WHEN AVAILABLE" button on our website: When you visit our website and find that the product you want is out of stock, look for the "NOTIFY ME WHEN AVAILABLE" button. Click on it and provide your email address. You will receive an email notification as soon as the product becomes available again.
2. Check your email frequently: Once you have provided your email address, we will notify you promptly via email once the product becomes available again. Make sure to check your email frequently so that you can be one of the first to know when the item is back in stock.(figure)
If the item you are looking for does not have the "NOTIFY ME WHEN AVAILABLE" button, there is a high probability that it will not be restocked. However, we encourage you to check back on our website frequently as we are always updating our inventory with new and exciting products.
We understand that waiting for a product to be restocked can be frustrating. However, we want to assure you that we are doing our best to expedite the process and get the item back in stock as soon as possible.
Why didn't I receive a tracking number?
1.Your order has not been fulfilled yet
If your order has not been fulfilled yet, you will have to wait until your order is fulfilled to receive a tracking number. When your order is fulfilled, you will be notified. You can check your current order status by clicking on the "View Order" in your order confirmation email.
Find my order status
Fulfillment Schedule
2. Amazon Logistics Order
If your shipping method shows "Amazon Logistics", your tracking number will be sent by Amazon within 1 or 2 days after your order has been fulfilled. Make sure to check your spam box. If you do not receive it, you can also contact us by submitting a ticket.
Software & Download
Where can I download FUSION software for my keyboard?
You can download the Fusion software from here.
How to Pair Your Wireless Mouse with the Receiver
If you're having trouble pairing your wireless mouse with the receiver, don't worry, we're here to help.
Follow these simple steps to get your mouse up and running in no time.
1. Download the pairing tool and run it
Click on the link that matches with your model :
- eS Mice
- Mice models after August 2023 (X2 v2, X2H, Xlite v3 etc)
- Mice models before August 2023 (X2 v1, Xlite v1, Xlite v2 etc)
Using the wrong pairing tool may have negative effects on your mouse, so make sure to select the correct one.
2. Do not connect your mouse with a cable, only plug in your receiver
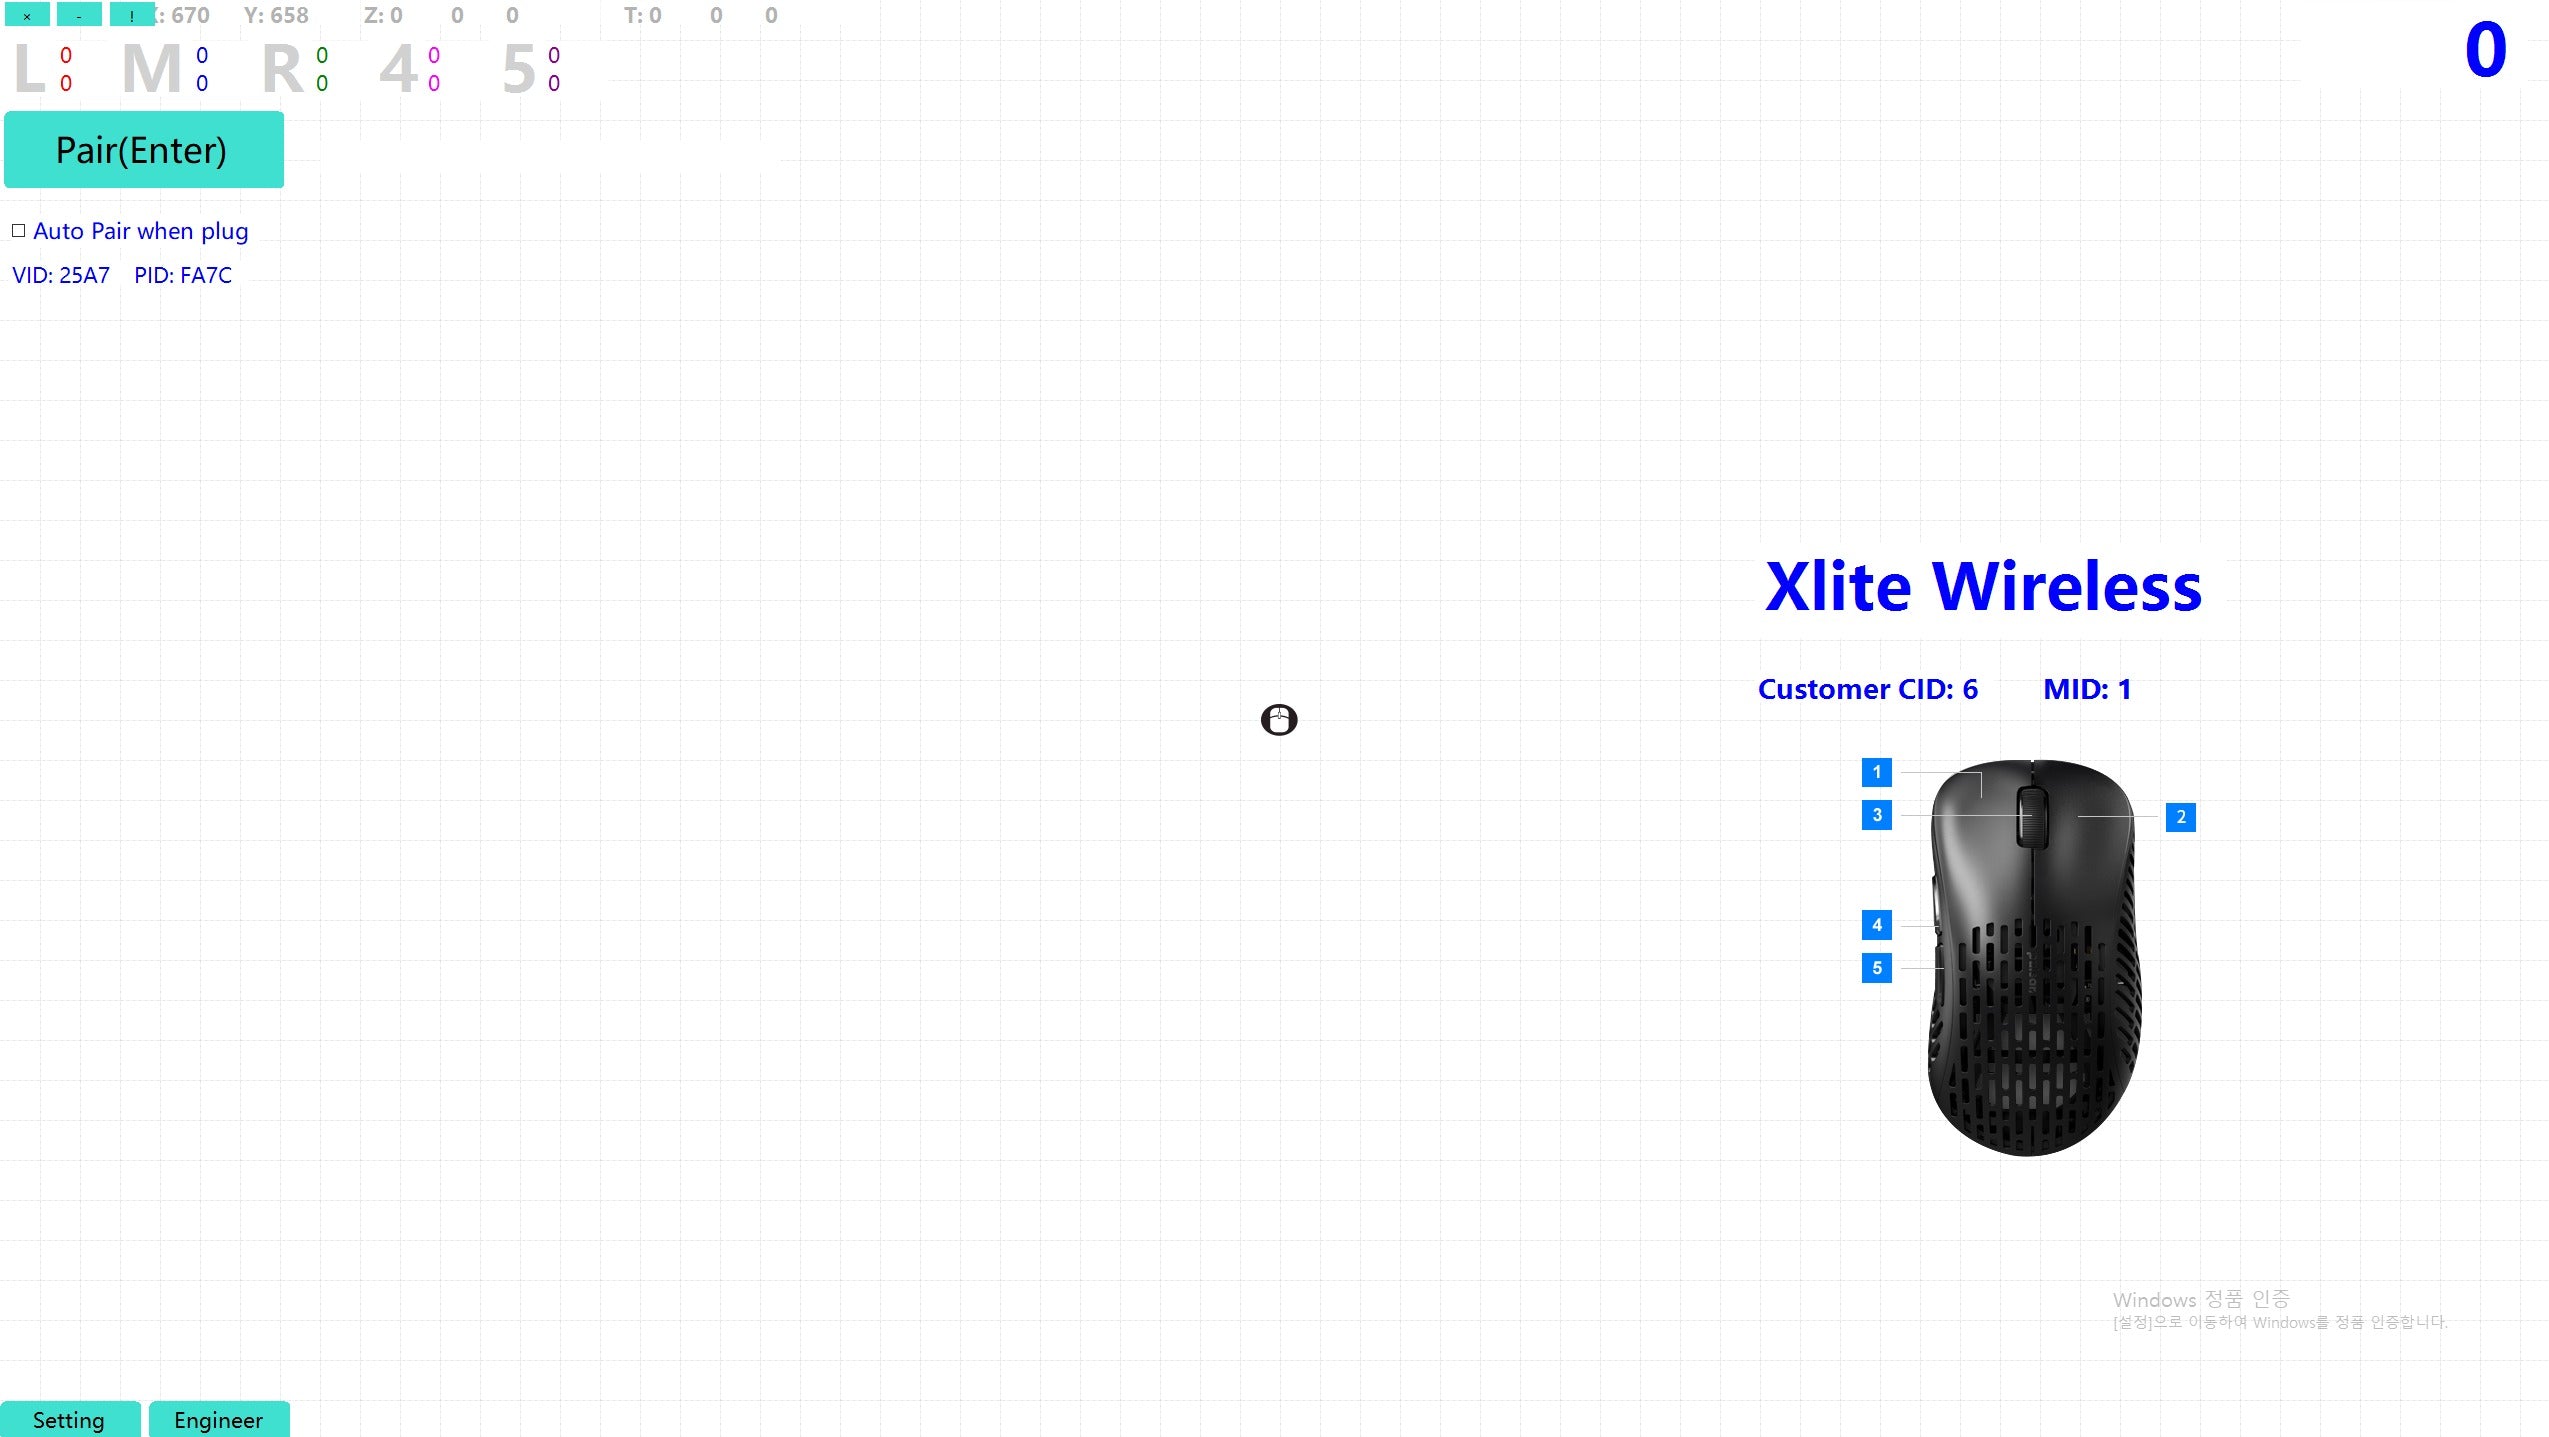
3. Click Pair(Enter) with another mouse or press Enter on your keyboard
If the button is greyed out, please try a different USB port.
4. Enter pairing mode
Hold LEFT+WHEEL+RIGHT Click of the mouse for 3 sec.
Your LED will blink Yellow.
5. Wait until the mouse pairs with the receiver
Make sure to keep the receiver close to the mouse during the process
In some cases, the software will show "Failure" but if your mouse works wireless, that will not affect performance.
If pairing does not work, please contact support.
Why does my mouse work wired but not wireless?
1. The mouse is not paired with the receiver:
If you received a new mouse and it was not working wireless out of the box, it may need to be paired with the receiver again. To do that, please follow the instructions in this article:
- Try pairing your mouse again
2. Something in your setup
Other wireless products can interfere with the mouse signal, make sure to bring the receiver close to your mouse using the extender, and turn off/put away any of the following devices:
- Wifi Router
- Other wireless mice
- Magnetic objects
- Wireless headsets
- RF signal receivers
If you use a cable extender, try testing the cable with another device to make sure it is not defective. Make sure to use the provided cable, and try comparing it with another one.
To make sure that something in your computer settings is not interfering with the receiver's driver, make sure try a different USB port, as well as a different computer.
3. Defective receiver
If none of the above solutions fixed your issue, it may be that your receiver is defective. If you have a valid warranty, please contact your seller as soon as possible. Otherwise, you can also purchase a new receiver on our website: pulsar.gg/dongle (For mouse generations prior to August 2023, find the 4K dongle for Nordic MCUs)
4. Defective mouse antenna
If replacing the dongle does not solve the issue, it may be that your mouse is defective. In that case, please contact your seller as soon as possible. Our repair services are only available if purchased from our official website (pulsar.gg), Amazon, or US retailer (micro center, lethal, etc)
When contacting your seller, make sure to:
1. Send a video including:
a. Your mouse, PC, and setup
b. Your software settings including your firmware versions, receiver version, software version
c. Your attempt to do the tests listed above
2. Iinclude the following In your message :
a. Name of shop where purchased
b. Order Number
c. Model Name and Size
d. Confirm that you have tried the previous tests and that you tried on a different PC.
Why is the Pulsar Fusion software not opening?
This could be caused by diverse issues.
1. Make sure you downloaded the latest version of the software
https://www.pulsar.gg/pages/download-x2
2. Make sure that you are using a compatible computer: currently only Windows 7 and above are supported.
3. Close all other running mice or keyboard programs
If this is still not working, please contact support and provide a video of the following steps:
1. Uninstall the software/Remove all installation files from your computer
2. Go to our software download page
3. Download the software
4. Install the software
5. Open Task Manager (CTRL ALT DEL)
6. Close all running programs
7. Open the software
How to use the mouse software?
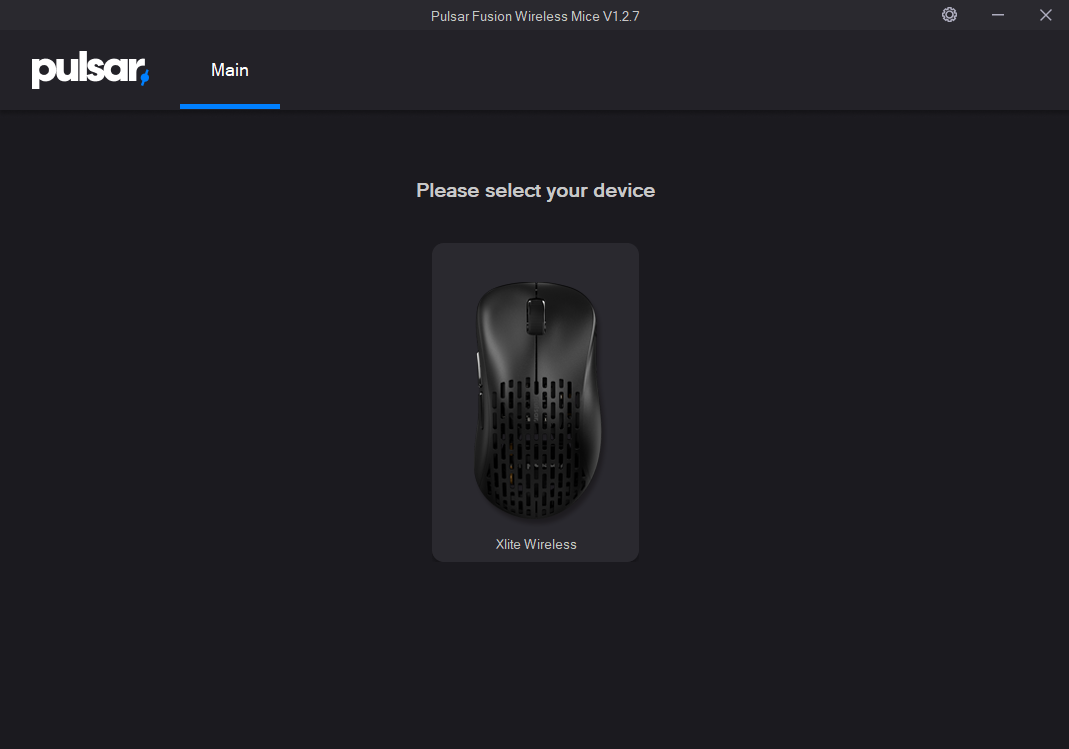
Main page: Device selection - The Model and size of your product will appear here when it is connected to your receiver or by cable.(above left figure)
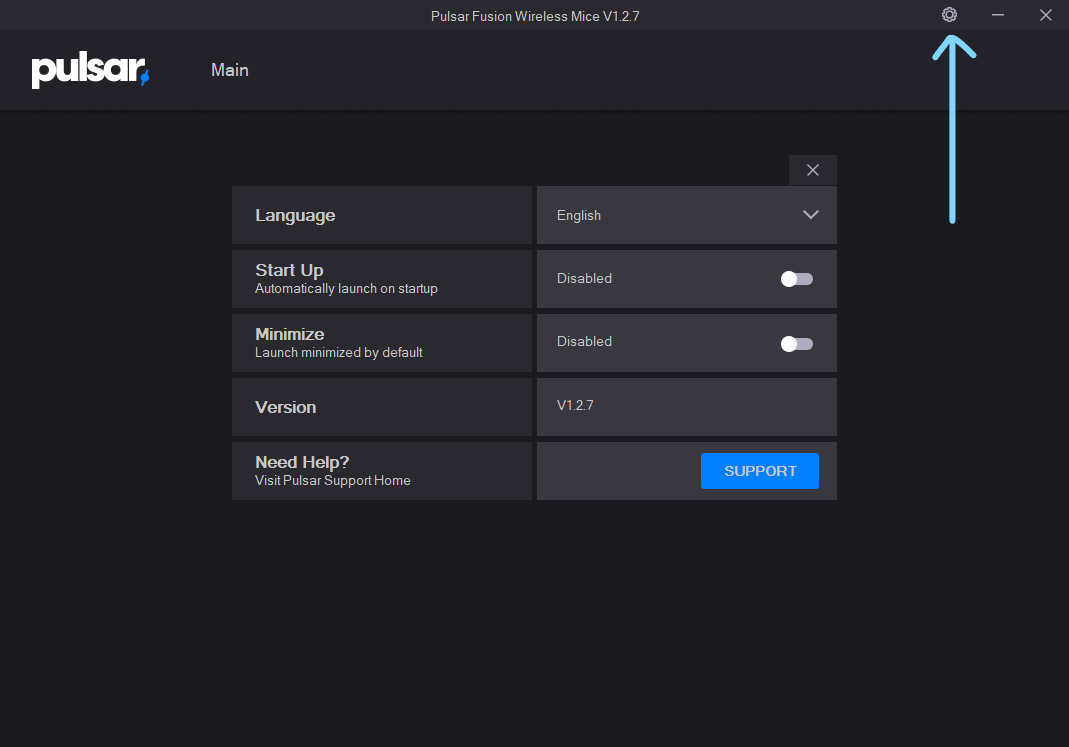
Software Settings: The settings menu gives you access to the software's program options.
Select your displayed language, and choose how you want your program to launch when your computer turns on. If the Start-Up option does not work, please place a shortcut of your software in this location: “C:\ProgramData\Microsoft\Windows\Start Menu\Programs\StartUp”
The version displayed here is the software's version, not the mouse or receiver's firmware version.
The latest available versions can be found here: puslar.gg/download
The last section is a link to this current page.(above right figure)
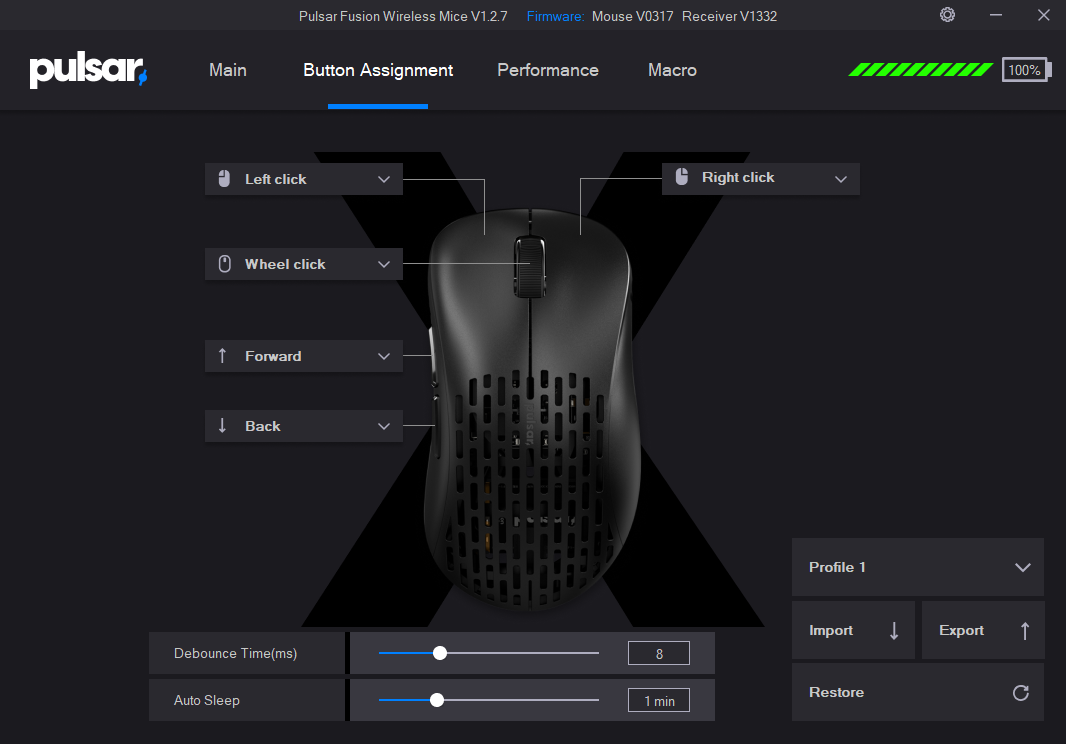
Button Assignment: Mouse basic settings
Firmware:Mouse V0317- This shows the mouse firmware version, which only appears if the mouse is plugged directly. (If both the receiver and the mouse are plugged, it may or may not appear)
Receiver V1332 - This shows the receiver firmware version, only shows if the receiver is plugged in.
The values shown in this screenshot are the default values for this product (Default values may differ depending on the product)(below left figure)
Debounce Time(ms): This is used to adjust double-clicking, if your mouse double-clicks, increase the number. At over 10ms, the switches are considered defective.
Auto Sleep:After the time selected, the mouse will enter sleep mode. When waking up, the mouse will lag, so it is recommended not to enter sleep mode during gaming. Reduce the auto-sleep if you wish to save battery.
The mouse buttons labels allow you to assign another function to each button. You must make sure that at least one button has the left click and right click functions.
You can create various settings profiles with the Profile button.
You can also export your settings into an external file for later. Select your desired settings, then export them into a file. When you want to go back to it, import the file with the import button.
If you restore the settings, the values will go back to default.
Motion Sync:
Motion sync technology guarantees that the mouse transmits sensor information to your computer precisely as frequently as it requests mouse position data.
This option is only available on compatible products (Not the Xlite V1, V2)
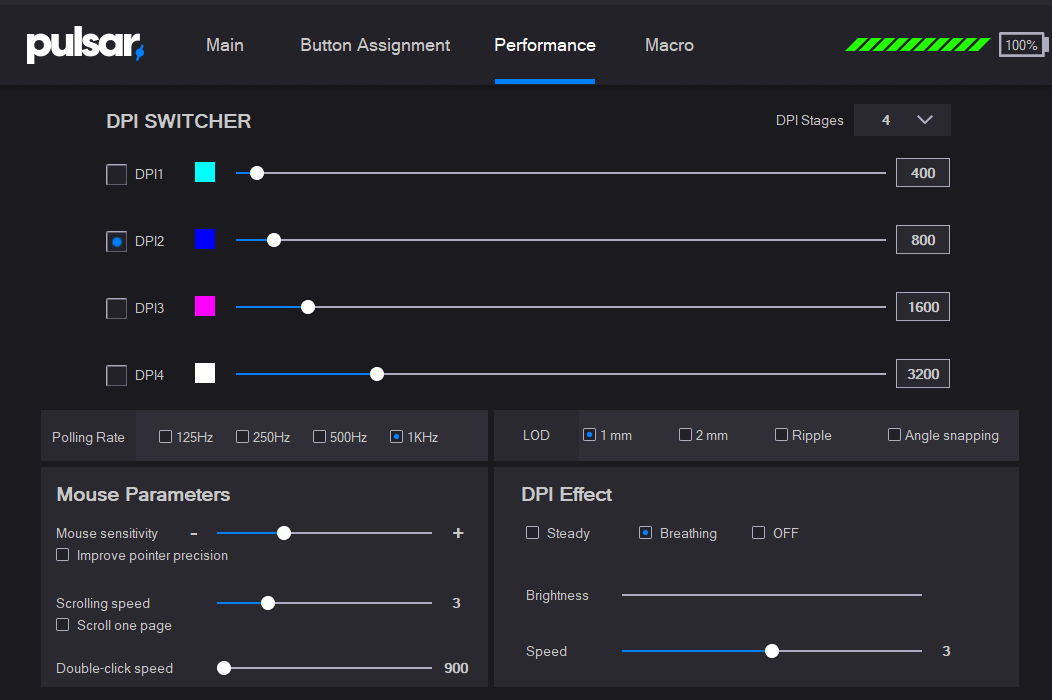
Performance(below right figure):
This menu allows you to adjust performance values.
You can select up to 3 DPI profiles, and switch between each profile with the DPI button on your mouse or the DPI shortcut on models that do not have a DPI button.
Polling rate: this is the rate of data transfer between your computer and your mouse. For 4K polling, you need to plug in the 4K receiver and use a compatible mouse.
Mouse sensitivity. This allows you to change the speed of your cursor relative to your mouse in a different method than DPI adjustment.
LOD: This option is used to adjust the distance of sensor capture, this can be useful if you use thick mouse feet, or mousepads with different textures/reflections.
Double click: On a Windows PC, to open a folder, by default, you have to double-click on the icon to open it. If the time between each click is longer than the number in these settings, your computer will consider it 2 single clicks, not a double click. This option is used to adjust what your computer considers a double click. If you only want your computer to consider double clicks when you click twice very fast, select the lowest number.
WindowsThis can be useful for example if you often have to rename files. On windows, if you press twice slowly on an icon, you can rename the file, but if you double click, it will open the file. If your double clicking speed is too high,you would need to make a big interval to rename the files.
This has nothing to do with double-clicking issues, if your mouse is "double-clicking' meaning it is clicking twice when you press the switch once, it is the debounce rate that needs to be increased, in the main menu.
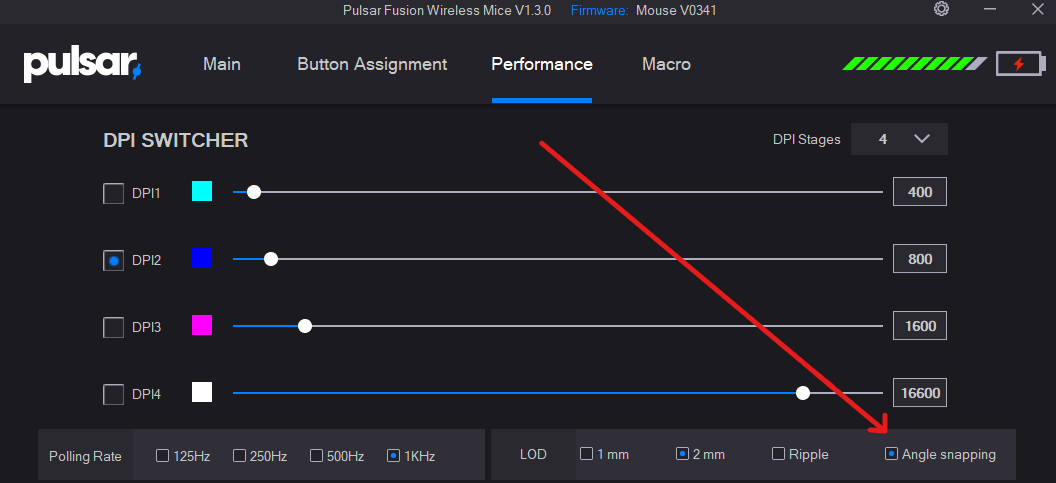
Angle snapping and Rippling allow to force the cursor to go in a straight line, this can be tested by attempting to draw a line in MS Paint.
DPI Effect: Adjust the color, brightness, and effect of the LED on your mouse. Breathing will make the LED slowly dim in and out. Speed is used to change how fast the breathing mode acts.
Macro: This is used to create advanced macros.
1. Create a macro by writing your desired title and pressing + (You can change the name using the edit icon)
2. If you have several macros, make sure to select the desired macro on the list
3. Press "Start Record"
4. Just type your desired keys on your mouse or keyboard
5. Press "Stop Record"
6. Make adjustment with the edit buttons
7. In the Buiton Assignment tab, select the label to which you wish to apply the macro
8. Select "Macro" in the list, and select the macro you wish to apply
Can you make it so that an alert is sent when the battery is low or provide an update?
We are considering this for future software updates. Additionally, when the battery is between 2-30%, the bottom LED of the mouse turns red or yellow, indicating a low battery. You can use the mouse while charging at this point.
For suggestions, please post your idea on discord.gg/pulsargg
How can I reset my mouse?
A. Restore your mouse settings:
Open Pulsar Fusion Software, in the button assignment tab, click on "Restore"
This will put your settings back to default.
B. Re-install your firmware:
1 - Go to pulsar.gg/pages/download
2 - Select your mouse model
3 - Click on "Firmware"
4 - Download the file
5 - Plug your mouse in
6 - Run the program
What is Ripple Control?
On your mouse settings you may have noticed the option called Ripple Control.
The purpose of this option is to make your mouse cursor movement appear smooth at high DPI.
However, this is done by recalculating the mouse input, and therefore it will create some delays, similar to MotionSync. For that reason, we do not recommend using it for games that require reactivity such as FPS games.
The Ripple control is only effective at high DPI settings. You will notice that at high DPI settings, mouse tracking curves are less smooth.(left figure)
Turning Ripple Control on will make tracking look more smooth at higher DPI, you can easily test this using MS Paint and changing settings just like on the pictures shown on this FAQ.(right figure)


What is Angle snapping and should I use it?
You probably noticed the Angle snapping option in the Fusion software, and are wondering whether you should use it or not.
Angle Snapping makes tracking on straight lines more straight. An easy way to test this is using MS Paint and drawing straight lines, you will see that it is easier when Angle snapping is turned on.
However we do not recommend using it in games that require tracking skills (Ex: FPS Games). The reason is that when it is turned on, the tracking and mouse inputs are recalculated, and will not match the real movement that you are making with your hand. To put in perspective, if you are aiming and moving horizontally on a straight line and you suddenly make a micro movement vertically, it may not be recognized, and you may miss your target.
Instead, we recommend that you practice drawing straight lines without it, train your muscle memory, and adjust other settings such as DPI or sentivity until you find the most conformatable settings.

Where can I download the Xlite v1 / Xlite Wired Software?
You can download the Xlite v1 / Xlite v1 Wired version from this link:
https://drive.google.com/file/d/13qjBJcig7GceMUNzGxnx7uQzyWlwFxJd/view?usp=sharing
Where can I download the keyboard software?
Please visit https://www.pulsar.gg/pages/download and choose your device.
X2V2, X2H, X2A Firmware Update
To update your firmware, follow these steps:
1. Begin by downloading the firmware file that matches your mouse model.
2. Next, connect your mouse to your computer using the appropriate cable.
3. Locate and run the firmware update program.
This process will ensure that your mouse's firmware is up-to-date and functioning optimally.
exeX2H Mini Fir...(9.17 MB)exeX2V2 Firmwar...(9.17 MB)exeX2H Firmware...(9.17 MB)exeX2A Firmware...(9.17 MB)exeX2V2 Mini Fi...(9.17 MB)exeX2A Mini Fir...(9.17 MB)
Where can I find my Pulsar Gaming Mouse's software?
All Pulsar Gaming Gear mice are supported by the same software, a download link can be found here: www.pulsar.gg/download
Warranty & Return
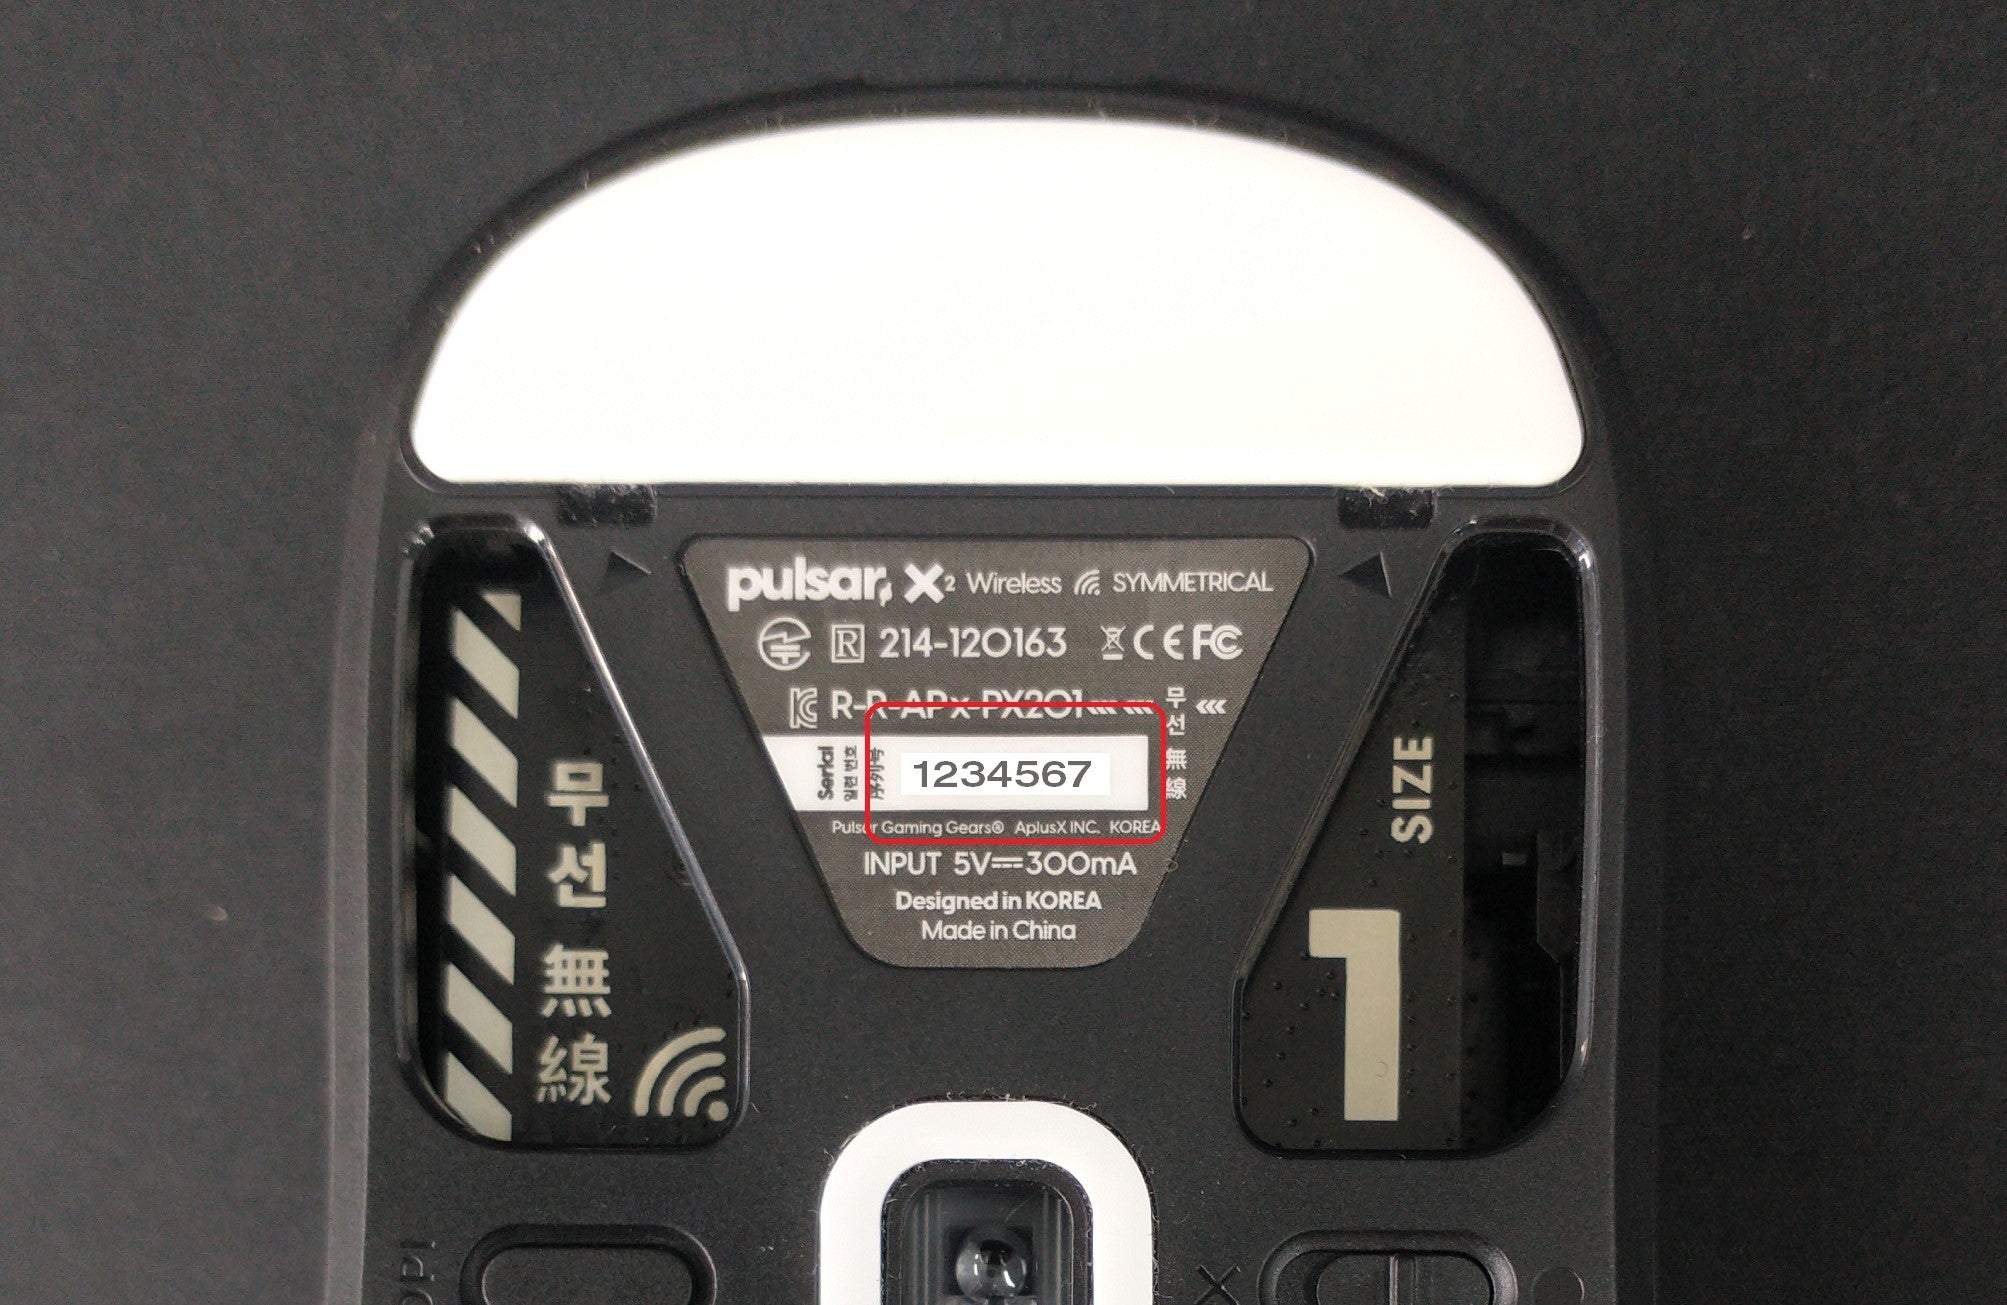
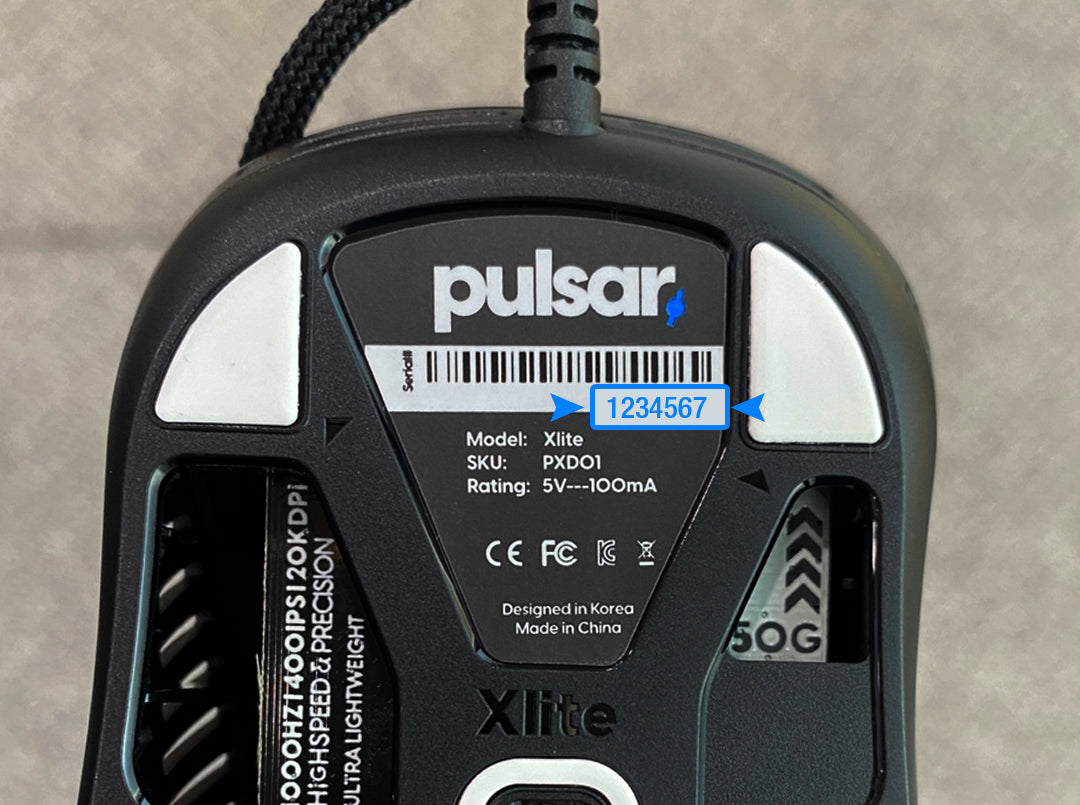
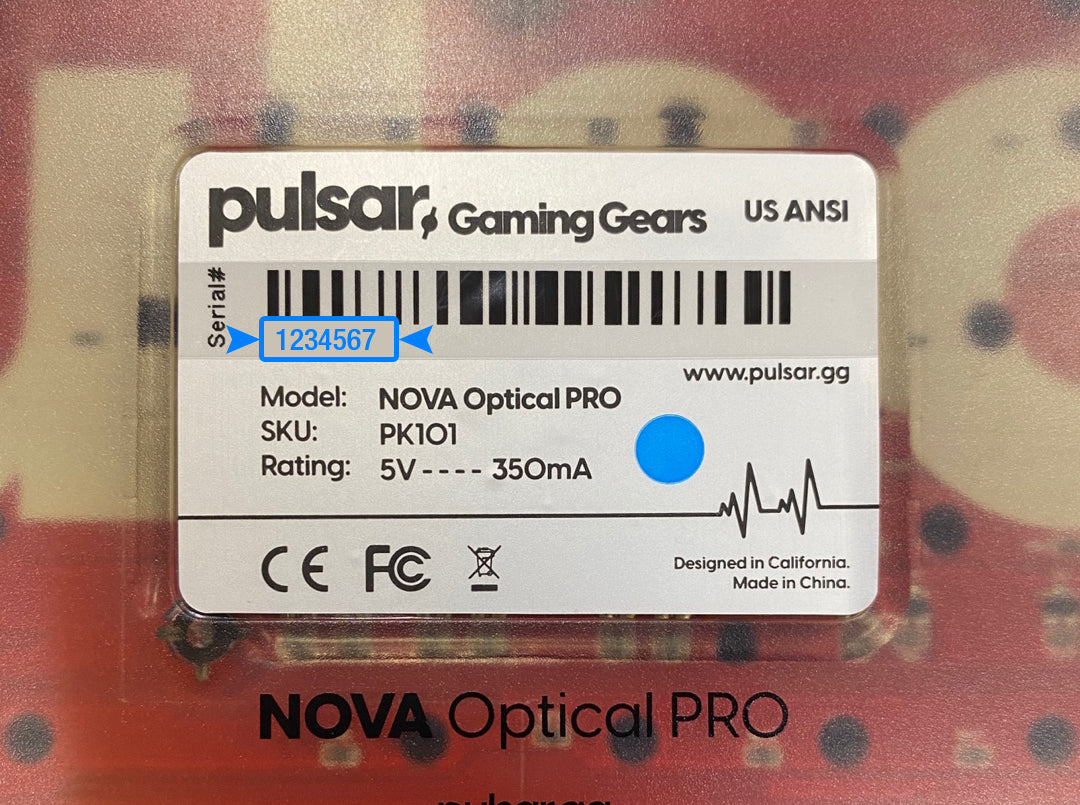
How to identify the serial number?
You can usually find the serial number on the back of the product.
What is my SKU?
The SKU is the code of your model.
It is usually found on the box of your product, it is usually composed of a combination of 4 to 10 letters and digits.
Mice:
▶ Xlite Series
Xlite Wired (PXD01, Black)
Xlite Wired (PXD02, White)
Xlite Wireless (PXW01, Black)
Xlite Wireless (PXW02, White)
Xlite Wireless (PXW03, Red)
Xlite Wireless (PXWFE)
Xlite Superglide (PXD01G, Black)
Xlite Superglide (PXD02G, White)
Xlite V2 (PXW21, Black)
Xlite V2 (PXW22, White)
Xlite V2 (PXW23, Red)
Xlite V2 (PXW24, FE GREEN)
Xlite V2 (PXW25, MAXGAMING EDITION)
Xlite V2 (PXW26, BLUE EDITION)
Xlite V2 (PXW27, PINK EDITION)
Xlite V2 Mini (PXW21S, Black)
Xlite V2 Mini (PXW22S, White)
Xlite V2 Mini (PXW23S, All Red Edition)
Xlite V2 Mini (PXW24S, FE GREEN)
Xlite V2 Mini (PXW25S, MAXGAMING EDITION)
Xlite V2 Mini (PXW26S, BLUE EDITION)
Xlite V2 Mini (PXW27S, PINK EDITION)
Xlite V2 (PXW28, RETRO GREY)
Xlite V2 Mini (PXW28S, RETRO GREY)
Xlite V2 (PXW29, RETRO BROWN)
Xlite V2 Mini (PXW29S, RETRO BROWN)
▶ X2 Series
X2 (PX201, Black Color)
X2 (PX202, White Color)
X2 (PX203, Red Color)
X2 (PX204, FE Green)
X2 Mini (PX201S, Black Color)
X2 Mini (PX202S, White Color)
X2 Mini (PX203S, Red Color)
X2 Mini (PX204S, FE Green)
X2 Mini (PX2RT, Rotobox Edition)
X2 (PX2BL, Bruce Lee Edition)
X2 Mini (PX2BLS, Bruce Lee Edition)
X2 (PX2PU, Purple Edition)
X2 Mini (PX2PUS, Purple Edition)
X2 (PX2BZ, Boardzy Edition)
X2 Mini (PX2BZS, Boardzy Edition)
X2 (PX2RF, Randomfrankp Edition)
X2 Mini (PX2RFS, Randomfrankp Edition)
X2 (PX2CP, Aim Trainer Pack)
X2 Mini (PX2CPS, Aim Trainer Pack)
X2 (PX2CL, Super Clear Edition)
X2 Mini (PX2CLS, Super Clear Edition)
X2 (PX205, Pink Edition)
X2 Mini (PX205S, Pink Edition)
X2 (PX2PB, Premium Black Edition)
X2 Mini (PX2PBS, Premium Black Edition)
X2 V2 Size 1 (PX2211, Black)
X2 V2 Size 1 (PX2212, White)
X2 V2 Size 1 (PX2213, Red)
X2 V2 Size 2 (PX2221, Black)
X2 V2 Size 2 (PX2222, White)
X2 V2 Size 2 (PX2223, Red)
X2 V2 Wireless Size 1 Green FE 4K (PX2214)
X2 V2 Wireless Size 2 Green FE 4K (PX2224)
X2 A Wireless Size 1 (PX2A13,Black/White)
X2 A Wireless Size 2 (PX2A23,Black/White)
X2 H Wireless Size 1 Black (PX2H11)
X2 H Wireless Size 1 White (PX2H12)
X2 H Wireless Size 2 Black (PX2H21)
X2 H Wireless Size 2 White (PX2H22)
X2 H Wireless Size 1 Red (PX2H13)
X2 H Wireless Size 2 Red (PX2H23)
X2 H Wireless Size 1 Green FE 4K (PX2H14)
X2 H Wireless Size 2 Green FE 4K (PX2H24)
▶ ES Series
Xlite V3 eS Wireless Size 2 (PXV3ES21/Black)
X2 A eS Wireless Size 2 (PX2AES21/Black)
X2 H eS Wireless Size 2 (PX2HES21/Black)
Keyboards:
▶ PCMK 60% Series
PCMK 60% ANSI : PCMK601B, Black
PCMK 60% ANSI : PCMK601W, White
PCMK 60% JIS : PCMK611B, Black
PCMK 60% JIS : PCMK611W, White
PCMK 60% ISO : PCMK621B, Black
PCMK 60% ISO : PCMK621W, White
▶ PCMK TKL Series
PCMK TKL ANSI : PCMK801B, Black
PCMK TKL ANSI : PCMK801W, White
PCMK TKL JIS : PCMK811B, Black
PCMK TKL JIS : PCMK811W, White
PCMK TKL ISO : PCMK821B, Black
PCMK TKL ISO : PCMK821W, White
▶ Lunar Alloy Series
Lunar Alloy TKL Rainbow : PK001, Red Switch
Lunar Alloy TKL Rainbow : PK002, Blue Switch
Lunar Alloy TKL Rainbow : PK003, Brown Switch
Lunar Alloy TKL RGB : PK010, Red Switch
Lunar Alloy TKL RGB : PK011, Blue Switch
Lunar Alloy RGB : PK020, Red Switch
Lunar Alloy RGB : PK021, Blue Switch
▶ Nova Optical Pro Series
Nova Optical Pro : PK100, Red Switch
Nova Optical Pro : PK101, Blue Switch
PMB01 Micro Bungee Bulk x 1 (Extra VHB, 1 set of Bungee)
PMB02 Micro Bungee x 3 (Extra VHB, 1 set of Bungee)
PXDGT Grip Tape for Xlite [SOFT]
PXDGT2 Grip Tape for Xlite [THIN]
PXDGT3 Grip Tape for Xlite Mini [THIN]
PX2GT Grip Tape for X2 [THIN]
PX2GT2 Grip Tape for X2 Mini [THIN]
PXDEF Xlite PTFE Mouse Feet
PXWFT Xlite Wireless PTFE Mouse Feet (original 0.8mm)
PXWF2 Xlite Wireless PTFE Mouse Feet (0.6mm)
PXWC1 Xlite Wireless PTFE Mouse Feet Control (0.6mm)
PXWFS Xlite Wireless PTFE Mouse Feet Set (0.6mm)
PX2F1 X2 Wireless PTFE Mouse Feet (0.6mm)
PX2F2 X2 Wireless PTFE Mouse Feet Thick (0.8mm)
PX2FS X2 Wireless PTFE Mouse Feet Set (Cut+0.6mm)
PXWRX Xlite Wireless Dongle Kit (dongle + Adapter)
P4KDGB Pulsar 4K Dongle Black
PMP01XL ParaControl Mouse Pad XL
PMP02XL ParaSpeed Mouse Pad XL
PMP03XL ParaBrake Mouse Pad XL
PMP11SB ParaControl V2 Mouse Pad S Black
PMP11MB ParaControl V2 Mouse Pad M Black
PMP11LB ParaControl V2 Mouse Pad L Black
PMP11XLB ParaControl V2 Mouse Pad XL Black
PMP11XLB2 ParaControl V2 Mouse Pad XL Black (490x420)
PMP11XLHB ParaControl V2 Mouse Pad XL Heavy
PMP11XXLB ParaControl V2 Mouse Pad XXL Black
PMP11XLS ParaControl V2 Mouse Pad XLS BLACK SQUARE 500x500
PMP11SR ParaControl V2 Mouse Pad S Red
PMP11MR ParaControl V2 Mouse Pad M Red
PMP11LR ParaControl V2 Mouse Pad L Red
PMP11XLR ParaControl V2 Mouse Pad XL Red
PMP11XLR2 ParaControl V2 Mouse Pad XL Red (490x420)
PMP11XXLR ParaControl V2 Mouse Pad XXL Red
PMP11XLL ParaControl V2 Mouse Pad XL BLUE EDITION
PMP11XXLL ParaControl V2 Mouse Pad XXL BLUE EDITION
PMP13XLB ParaBrakeV2 Mouse Pad XL Black
PMP13XLR ParaBrakeV2 Mouse Pad XL RED
PMP13XXLB ParaBrake V2 Mouse Pad XXL Black
PMP13XXLR ParaBrake V2 Mouse Pad XXL RED
PMP12XLB ParasSpeed V2 Mouse Pad XL Black
PMP12XXLB ParasSpeed V2 Mouse Pad XXL Black
Superglide Feet
PXWSGW Superglide for Pulsar Xlite Wireless [White]
PXWSGR Superglide for Pulsar Xlite Wireless [Red]
PXWMXG Superglide for Pulsar Xlite Wireless [Maxgaming Blue]
PXWSGY Superglide for Pulsar Xlite Wireless [Yellow]
PXWSGL Superglide for Pulsar Xlite Wireless [Edition Blue]
LGSSGB Superglide for Logitech GPro Superlight [Black]
LGSSGW Superglide for Logitech GPro Superlight [White]
LGSSGM Superglide for Logitech GPro Superlight [Magenta]
LGSSGR Superglide for Logitech GPro Superlight [Red] - FE Limited Edition
LGPSGW Superglide for Logitech GPro Wireless [White]
LGPSGL Superglide for Logitech GPro Wireless [Blue]
LGPSGR Superglide for Logitech GPro Wireless [RED] - FE Limited Edition
LG7SGW Superglide for Logitech G703 / G603 / G403 [White]
LG7SGL Superglide for Logitech G703 / G603 / G403 [Blue]
L52SGW Superglide for Logitech G502 [White]
L52SGB Superglide for Logitech G502 [Black]
L33SGW Superglide for Logitech G303 Shroud [White]
L33SGB Superglide for Logitech G303 Shroud [Black]
L34SGW Superglide for Logitech G304/305 [White]
L34SGL Superglide for Logitech G304/305 [Light Blue]
L90SGW Superglide for Logitech G900/903[White]
L90SGB Superglide for Logitech G900/903[Black]
RVUSGW Superglide for Razer Viper Ultimate [White]
RVUSGG Superglide for Razer Viper Ultimate [Green]
RVMSGG Superglide for Razer Viper Mini [Green]
RVMSGW Superglide for Razer Viper Mini [White]
RV8SGG Superglide for Razer Viper 8K / Viper [Green]
RV8SGW Superglide for Razer Viper 8K / Viper [White]
RBUSGW Superglide for Razer Basilisk Ultimate [White]
RBUSGG Superglide for Razer Basilisk Ultimate [Green]
RO2SGW Superglide for Razer Orochi V2 [White]
RO2SGG Superglide for Razer Orochi V2 [Green]
RD2SGG Superglide for Razer DeathAdder V2 Pro / V2 HyperSpeed [Green]
RD2SGW Superglide for Razer DeathAdder V2 Pro / V2 HyperSpeed [White]
FSLSG1 Superglide for Razer DeathAdder V2 Pro / V2 HyperSpeed [White]
FSLSG2 Superglide for Finalmouse Starlight-12 M / S [White]
ZECSGB Superglide for Zowie EC series [Black]
ZFZSGB Superglide for Zowie FK/ZA/S series (No ZA13) [Black]
RKPSGB Superglide for Roccat Kone Pro / Pro Air [Black]
SPMSGW Superglide for SteelSeries Prime Mini Wired / Wireless [White]
EXMSGW Superglide for Endgame Gears XM1 RGB / XM1r [White]
GMOSGW Superglide for Glorious Model O / Model O- [White]
GMDSGW Superglide for Glorious Model D [White]
GDMSGW Superglide for Glorious Model D -
VNPSGB Superglide for Vaxee Zygen NP-01 / Outset AX [Black]
VNPSGW Superglide for Vaxee Zygen NP-01 / Outset AX [White]
XM4SGW Superglide for Xtrfy M4 Wireless
RNPSGW Superglide for Razer Naga Pro [White]
RNPSGG Superglide for Razer Naga Pro [Green]
AIMCAT1 Superglide for Maxgaming AimCat Gpro Superlight
AIMCAT2 Superglide for Maxgaming AimCat Xlite Wireless
GHSSGW Superglide for G-Wolves Hati-S Wireless
FSLSG3 Superglide for Finalmouse Starlight-12 M / S [Poseidon Blue]
FSLSG4 Superglide for Finalmouse Starlight-12 M / S [Poseidon White]
FSLSG5 Superglide for Finalmouse Starlight-12 M / S [Phantom Arrow]
FSLSG6 Superglide for Finalmouse Starlight-12 M / S [Red Arrow]
6MMSGW Superglide for Universal 6mm x 8 [White]
MXNSG1 Superglide for MXGXNACHO Logitech GPROX Superlight [MIAMI]
MXNSG2 Superglide for MXGXNACHO Pulsar Xlite,V2,V2 Mini [MIAMI]
MXNSG3 Superglide for MXGXNACHO Endgame xm1 RGB / XM1r[MIAMI]
MXNSG4 Superglide for MXGXNACHO Logitech g303 se [MIAMI]
MXNSG5 Superglide for MXGXNACHO Finalmouse Starlight-12 M / S [MIAMI]
RVPSGG Superglide for Razer Viper V2 PRO [Green]
PX2SGB Superglide for X2 Wireless Black
PX2SGW Superglide for X2 Wireless White
PX2SGR Superglide for X2 Wireless Red
RD3SGG Razer DeathAdder V3 Pro [Green]
RD3SGW Razer DeathAdder V3 Pro [White]
S39SGW SteelSeries Aerox 3/Aerox 9 Wireless [White]
SA3SGW SteelSeries Aerox 3 Wiress [White]
XMZSGW Xtrfy MZ1 Wirelsss [White]
RB3SGG Razer Basilisk V3 Pro [Green]
VXESGW Vaxee XE [White]
L5XSGW Superglide for Logitech 502X [White]
Superglide Pad:
SGPXLW Superglide Pad XL White
SGPXLB Superglide Pad XL Black
SGPXLR Superglide Pad XL Red
SGPLW Superglide Pad L White
SGPLB Superglide Pad L Black
SGPLR Superglide Pad L Red
For Mice and Keyboards not included on this list, you can easily find it on the list on the registration page, under the "Model" section: pulsar.gg/register
For other products, contact us on pulsar.gg/support
Who should I contact for if I have an issue with my product?
Store Policy
Returns, refunds, shipping issues, and payment issues are all store policies, not warranty policies, so for these, you must contact your seller.
The store policy terms may differ from seller to seller, and you must refer to the seller's terms before making your purchase, not the store policy of pulsar.gg
2-Year Warranty
Some products including Pulsar Keyboards and all Pulsar mice have a 2-year warranty, meaning that Pulsar Gaming Gears is responsible for making sure that products will properly work for 2 years from your date of purchase.
To make the process easier, we have agreed with most sellers that they assist us in this process, so if you have any issues, make sure to first contact your seller directly to see what options they can offer. If you are not satisfied with the options you are offered,if you live too far away from that seller, or if you prefer going through Pulsar directly for any particular reason, you can do so too, however please note that the process may take longer since Pulsar is based in South Korea.
During the after-service process, you will be requested to submit a proof of purchase (Order number/ Receipt) This will be used to check the date of your purchase and if your warranty is still valid. If you have lost it, please contact the store where you purchased your item, and try to retrieve your order information by providing information such as your name, phone number, email, address or payment method.
If you did not buy from an official store, if you got your product as a gift, or bought it second-hand, you still benefit from the Warranty coverage. However, you should first contact the seller or original owner and ask them to provide you with their original proof of purchase.
If you are unable to retrieve proof of purchase, you can still benefit from the warranty coverage, however, the 2 years will begin from the date of departure from our manufacturing facility, not the date of purchase. In that case, you will be required to provide your serial number and contact Pulsar Support directly by submitting a ticket above.
General Warranty Information
Q: What is the Pulsar Gaming Gears Limited Warranty Policy?
A: The Pulsar Gaming Gears Limited Warranty Policy outlines the terms and conditions for warranty coverage on our products.
Q: Does the warranty apply to all sellers?
A: Our repair services are only available if purchased from our official website (pulsar.gg), Amazon. For purchases from other sellers, refer to their warranty policies.
Q: What do I need to claim warranty service?
A: You need a valid proof of purchase (sales receipt or order number) and the product's serial number.
Q: How can I register my product?
A: You can register your warranty at pulsar.gg/register. It is not required but can be useful in case you lose the necessary information regarding your order.
Q: Do different models have different warranty terms?
A: Yes, different models may have varying warranty policies and terms.
Q: Can I modify or customize the product without voiding the warranty?
A: Customizing or modifying the product without authorization may void the warranty. Request authorization at pulsar.gg/support.
Q: Can I return a product to a different address or country?
A: Warranty services are provided at the original address and country. Contact us for authorization if returning from a different address or country.
Q: What compensation options are available for refunds?
A: Compensation options include a replacement of the same item, a different item of similar value, or a gift card/discount coupon depending on the circumstance.
Q: What items are required when submitting a warranty coverage request?
A: You may need an internet connection, a computer to submit forms, a printer for shipping labels, video evidence of defects, and measuring devices.
2 Years: Repairs
Q: What's covered by the 2-year repair warranty?
A: Defective items are repaired for 2 years after the purchase date.
Q: What if the product can't be repaired?
A: If unrepairable, a replacement or refund may be offered.
Q: Who pays for shipping during repairs?
A: The seller covers shipping costs with provided pre-paid labels.
Repairs and Replacement Parts
Q: What evidence do I need for repair requests?
A: Provide evidence of the defect and follow the tests requested.
Q: Can I return a non-defective product for repair?
A: If the product is not defective, you'll pay for shipping to and from the repair center.
Q: What happens if parts are replaced during repairs?
A: Components that need replacement may be substituted with new stock parts.
Q: Do you offer temporary replacements during repairs?
A: No, temporary replacements or loaner products are not provided.
Q: What if the serial number needs replacement during repairs?
A: The serial number may be substituted with a new one if needed.
What are the limitations of liability?
Pulsar Gaming Gears is not liable for incidental or consequential damages beyond the purchase price.
What if my product is out of warranty?
For products beyond the warranty period, Pulsar Gaming Gears offers paid post-warranty repair services.
What does the limited warranty cover?
The limited warranty covers defects and malfunctions during the specified warranty periods.
What are the excluded circumstances?
Exclusions include damages from misuse, modification, improper installation, accidents, and more.
Is the warranty transferable?
If you purchased from our online store (pulsargg.eu) or our Amazon stores, yes, you can transfer your warranty if you offer a product as a gift, or sell it to someone. You must provide your order number, and you may be contacted to confirm the warranty transfer.
Additional information may be requested to confirm the identity of the original warranty holder.
If you purchased from a different seller, you must contact them to check if you can transfer your warranty.
Will I void my warranty if I open my product?
Replacing mouse feet will not void a mouse warranty.
On the other hand, opening a product, removing the screws, and replacing parts can void a warranty.
If you wish to open your mouse to clean it, repair it, or replace parts you must first contact your seller for authorization. Although this will depend on your seller and their warranty terms, generally you can get authorization to open your mouse without voiding your warranty.
However, if you break anything during the process of opening the mouse and related operations, this may not be covered by your warranty. Therefore if you have an issue with your mouse, you must report it and request authorization before attempting to repair it, because it could be considered as caused by the operation.
If you purchased from one of our stores, please contact us by submitting a ticket, send us an explanation of why you wish to open your mouse, and we will get back to you shortly.
10 Days: Replacements and Claims
Q: What issues are covered within the 10-day window?
A: Dead On Arrival (DOA), missing parts, wrong items, and missing items are covered within the first 10 days.
Q: How do I report a defective item or missing component?
A: Report the issue within 10 days of receiving the package by contacting Pulsar Gaming Gear Support at pulsar.gg/support.
Q: What happens if my product is defective within 10 days?
A: If the product is defective within 10 days, we'll replace it and cover shipping expenses.
Q: Can I get a refund if I change my mind about a defective product?
A: No, refunds are not available for changed minds about defective products within the 10-day window.
Q: What if I bought from another store like Amazon or Newegg?
A: Refer to their warranty policies for products bought from other Pulsar Gaming Gears' stores.
Q: What should I include in pictures of the package for claims?
A: Include pictures of the outer packaging, labels, and contents as received.
Q: How can I find the inclusive item list for my product?
A: Check the user manual or product page on the web for the inclusive item list.
Q: Can I report shipping damages after the 10-day period?
A: No, shipping damages must be reported within the 10-day period.
Q: What if I refuse a package or provide inaccurate shipping information?
A: You'll be responsible for additional shipping expenses and possible deductions from the refund.
Q: What if a product is held in customs due to my delay or request?
A: You'll be responsible for expenses related to handling and storage in customs.
Consumables
Q: What are consumable products?
A: Consumables include products with one-time use or that degrade over time.
Ex: Superglide feet, Arm sleeves, Mouse accessories etc.
Q: Can I return opened consumable products?
A: No, opened consumables are not eligible for returns.
What if my product is inspected and no defect is found?
You may be charged for inspections if no defects are discovered.
Contact Pulsar EU support team for further help, or join Pulsar Discord and ask the community:


